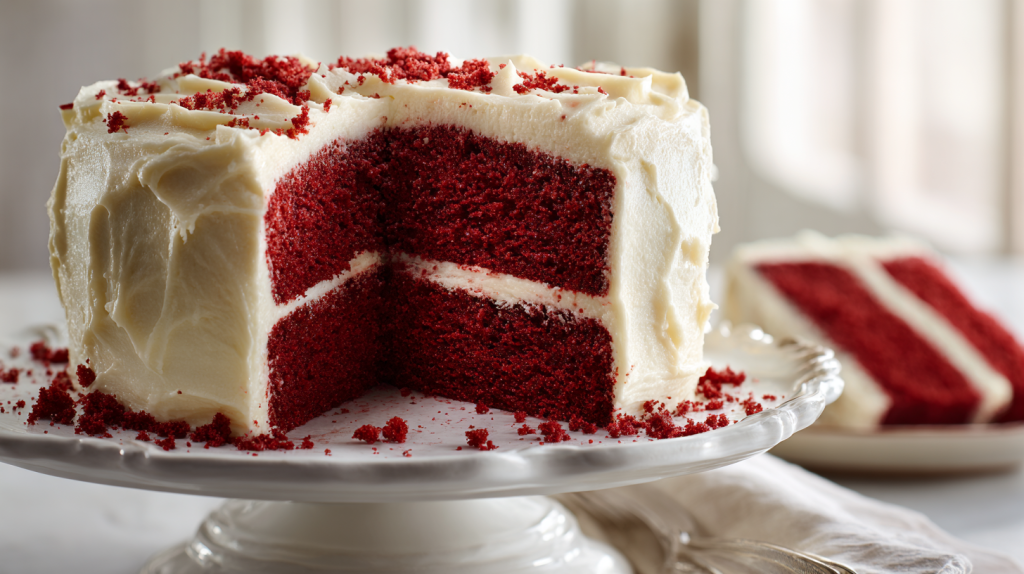
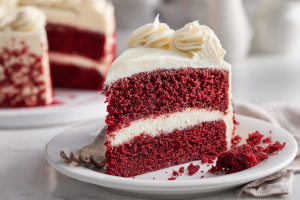
This definitive Red Velvet Cake Recipe settles the age-old debate by delivering a mild chocolate flavor paired with a signature velvety texture.
By combining butter for richness and oil for moisture, along with a special egg-white folding technique, this method guarantees an impossibly soft, airy crumb that stays fresh for days. It creates a stunning showstopper for your holiday table, topped with a tangy cream cheese frosting that perfectly balances the sweet cake. For an unforgettable finish to your meal, serve a generous slice alongside a scoop of Homemade Vanilla Ice Cream.
It’s one of the great kitchen debates, isn’t it? You taste that hint of cocoa, but the cake is bright red and has that wonderful, tangy flavor from the cream cheese frosting. It’s a puzzle. It leaves you wondering, “Is red velvet cake chocolate cake, or is it just a fancy red vanilla cake?” I’ve baked this cake for more gatherings than I can count, and I’m going to settle this question for you, once and for all. We’ll walk through what really makes a red velvet cake, why it’s in a class all its own, and I’ll share the thinking behind the recipe that has become the pride of my kitchen.
So, Let’s Settle This: Is Red Velvet Cake Chocolate Cake?
The simplest answer, and the one I’ve stood by for thirty years, is this: yes, it is a type of chocolate cake.
But it’s not the one you’re thinking of.
When we hear “chocolate cake,” we picture a dark, rich Devil’s Food or a deep, nutty German Chocolate cake. Those cakes are forward with their chocolate flavor. The cocoa powder is the star of the show.
In a red velvet cake, the chocolate is a gentle supporting actor. It’s a mild chocolate cake.
My recipe, for instance, only uses a few tablespoons of unsweetened cocoa powder. This isn’t to make you stop and say, “What a wonderful chocolate cake!” It’s there to add a hint of flavor, a bit of depth and complexity that you would miss if it were gone. It’s what balances the sweetness of the sugar and the tang of the buttermilk.
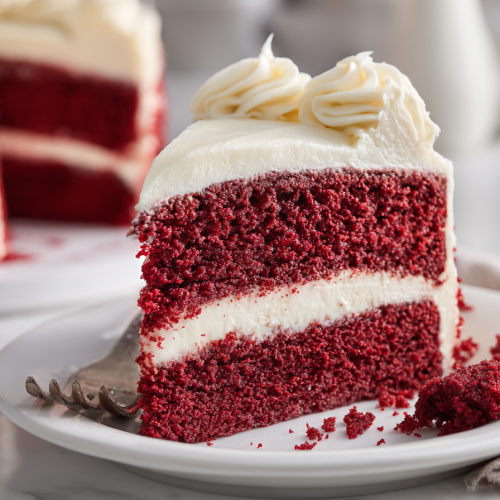
The main flavor profile of a red velvet cake is a beautiful harmony. You get a gentle kiss of cocoa, a rich buttery vanilla note, and that signature tangy finish from the buttermilk. The name “red velvet” tells you the two most important parts: the color, which we’ll get to, and the texture.
That velvety texture is the real star.
What Makes It “Velvet”? The Secret is in the Science
 This is the part I find so fascinating. “Velvet” isn’t just a pretty name; it’s a description of the texture. Back in the Victorian era, “velvet” cakes were a whole category, known for their soft, fine crumbs. They were seen as a luxury.
The secret is in the ingredients. In my recipe, we use two very important acidic ingredients: buttermilk and a little touch of white vinegar.
These acids do two magical things in the batter.
First, they react with the baking soda. This reaction creates tiny bubbles of carbon dioxide, which gives the cake a wonderful, airy lift. It’s a gentler, finer lift than you get from baking powder alone.
Second, the acid works on the flour itself. It tenderizes the protein (the gluten), which helps create that soft, fine-grained texture. It’s what makes the cake melt in your mouth. It’s just a lovely, lovely thing to eat.
Why Red Velvet Became the Perfect Christmas Dessert
There is simply no cake more festive for a holiday table. When you bring out a red velvet cake, people’s eyes just light up.
That deep, dramatic red crumb against the pure, snowy white of the cream cheese frosting… it’s just a showstopper. It looks like Christmas on a plate.
But it’s more than just the looks. The flavor is such a welcome, sophisticated change from the heavier spices we often have during the holidays, like gingerbread or heavy fruitcake.
A red velvet cake is light, tangy, and elegant. It’s the perfect, special-occasion ending to a big Christmas dinner. It’s not an everyday cake. It signals a celebration. My grandchildren always ask for this, not the cookies, when December rolls around. They call it the “Santa Claus Cake,” and I suppose it’s easy to see why.
But Why Is It Red? (It Wasn’t Always So Bright)
Now, this is the part that surprises most people. That bright, scarlet color is a fairly modern invention.
Originally, the “red” in red velvet cake was more of a reddish-brown, and it came from a chemical reaction.
In the old days, cocoa powder was different. It was what we call “non-alkalized” or “natural” cocoa. This type of cocoa powder is acidic. When that acidic cocoa powder mixed with the acidic buttermilk and vinegar, it would turn a faint, ruddy, reddish-brown color.
Then, during the Great Depression, a company in Texas called the Adams Extract Company was looking to sell more of its food coloring. They came up with a brilliant marketing idea: a red velvet cake made with their bright red food dye. They printed recipe cards and posters, and the vibrant, eye-catching cake we know today was born.
So, the bright red color is purely for that beautiful, dramatic look. And goodness, is it beautiful.
How My Recipe Answers the “Is Red Velvet Cake Chocolate Cake” Debate
 The recipe I share on this site is the result of decades of testing in my own kitchen. It’s designed to be the very best of all worlds, and it perfectly settles the is red velvet cake chocolate cake debate. It is a chocolate cake, but one that is defined by its tenderness.
I’ve seen so many recipes that make you choose, and I found that was a compromise I just wasn’t willing to make.
For instance, many old recipes use only shortening for a tender texture, or only oil for moisture. I use both unsalted butter and vegetable oil. The butter gives you that rich, creamy, unmistakable flavor. The oil is my insurance policy for a cake that stays moist and tender for days. You get flavor and a perfect texture.
But the real secret, the one I hold dearest, is that we separate the eggs. This is a trick my mother taught me. The yolks go into the batter for richness, but we beat the four egg whites into soft, fluffy peaks and fold them in at the very end.
This is what guarantees the “velvet” in the cake. It’s an extra step, yes, but it’s the most important one. It creates an impossibly light and airy crumb that all the baking soda in the world can’t fake.
A Baker’s Pro-Tip: Room Temperature is Not a Suggestion
I see so many new bakers get frustrated when their batter curdles or their frosting breaks. They think they’ve done something wrong, but it’s almost always this: your cold ingredients are fighting each other.
You simply must have your eggs, butter, and especially your buttermilk and cream cheese at true room temperature. Not “sat on the counter for 10 minutes.” I mean a good hour for the eggs and buttermilk, and two hours for the butter and cream cheese.
When they are all at the same temperature, they emulsify. That’s a fancy word for them all coming together in a smooth, uniform batter and a creamy, lump-free frosting. This is the foundation for a good cake.
Common Mistakes to Avoid for a Perfect Velvet Crumb
After all these years, I’ve seen every mistake in the book. These are the three most common, and they are so easy to avoid.
- Over-mixing the Flour. The moment that flour goes in, your enemy is time. As soon as you mix, gluten starts to form. Gluten is what makes bread wonderfully chewy, but it makes a cake tough and dense. You must mix only until the last streak of flour disappears. This is why my recipe has you finish the last step by hand, not with the mixer. Your mixer is too fast and too strong.
- Using the Wrong Food Coloring. Please, set that little liquid dropper bottle aside. Liquid food coloring is very weak. You’d have to use the whole bottle to get a good color, and that adds a bitter, chemical taste to the cake. You must use a gel food coloring. It’s highly concentrated, so you only need a teaspoon or two for that deep, beautiful red, with no aftertaste.
- Frosting a Warm Cake. Patience is the hardest ingredient in baking, I know. You’ve made this beautiful thing, and the house smells amazing, and you just want to get it finished. But if that cake is even slightly warm, your lovely cream cheese frosting will melt, weep, and slide right off the sides. Let it cool. Completely. I mean it.
My Secret for the Tangiest, Fluffiest Cream Cheese Frosting
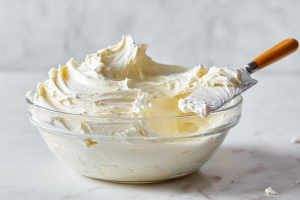 Here’s a little trick for frosting that is perfectly tangy and not so sugary that it makes your teeth hurt.
First, use full-fat, block cream cheese. The kind in the silver brick. Do not use the whipped cream cheese in a tub. It has too much water and air and will make your frosting runny.
Second, just like I said before, your butter and cream cheese should be softened, but still cool to the touch. If they’re warm and mushy, your frosting will be loose and sloppy.
Finally, the salt. A good pinch of salt (about 1/4 or 1/2 teaspoon) in the frosting doesn’t make it “salty.” It cuts the sweetness and makes the tangy flavor of the cream cheese pop. It’s what balances the whole cake. Trust me on this.
This frosting is so good, you’ll want to use it on everything. I’ve even seen it used on a simple carrot cake or even banana bread.
The Only Red Velvet Cake Recipe You’ll Ever Need
Now that you know the history and the “why” behind it all, you’re ready. I am so happy to share this recipe with you. It has been the centerpiece of so many of our family’s celebrations, and I hope it becomes one for yours, too.
It’s More Than a Cake
So, the next time someone asks you ‘is red velvet cake chocolate cake?’, you can smile and tell them the whole story. You can tell them it’s a very special kind of mild chocolate cake, where the real magic is in the velvety-soft crumb and the tangy-sweet frosting.
Baking is about more than just following steps. It’s about putting love and a little bit of know-how into what you make. It’s about understanding why you’re doing what you’re doing.
I hope this recipe brings you as much joy as it has brought my family. I have a feeling it will be your new favorite christmas dessert for many years to come. Happy baking.
Red Velvet Cake with Tangy Cream Cheese Frosting
Equipment
- Stand mixer with paddle and whisk attachments (or a hand mixer)
- Two 9-inch round cake pans
- Parchment paper rounds
- Wire cooling rack
- Offset spatula
- Rubber spatula
- Flour sifter or fine-mesh sieve
- 3-4 separate mixing bowls
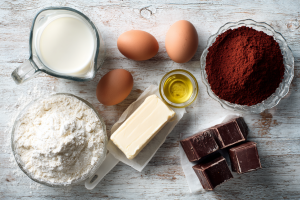
Ingredients
For the Red Velvet Cake:
- 3 cups cake flour (spooned & leveled)
- 3 Tbsp unsweetened natural cocoa powder
- 1 tsp baking soda
- 1 tsp baking powder
- 1/2 tsp salt
- 1/2 cup unsalted butter, softened to room temperature
- 1 cup canola or vegetable oil
- 2 cups granulated sugar
- 4 large eggs separated, at room temperature
- 1 Tbsp pure vanilla extract
- 1 tsp distilled white vinegar
- 1 cup buttermilk, at room temperature
- 1-2 tsp red gel food coloring use gel for the most vibrant color without a bitter taste
For the Tangy Cream Cheese Frosting:
- 16 oz full-fat block cream cheese, softened but still cool
- 3/4 cup unsalted butter, softened but still cool
- 5 cups confectioners' sugar, sifted
- 1 1/2 tsp pure vanilla extract
- 1/4 tsp salt or to taste
Instructions
Prep Your Pans and Dry Ingredients
- Position a rack in the center of your oven and preheat to 350°F (177°C).
- Grease and flour two 9-inch round cake pans. Line the bottoms with parchment paper rounds, then grease the parchment paper. This guarantees your cakes will never stick.
- In a medium bowl, sift or whisk together the cake flour, cocoa powder, baking soda, baking powder, and salt. Sifting is key here to break up any lumps in the cocoa and flour. Set aside.
Mix the Wet Ingredients
- In the bowl of a stand mixer fitted with a paddle attachment (or in a large bowl with a hand mixer), beat the softened butter and granulated sugar on medium speed for about 1-2 minutes until combined and sandy.
- With the mixer on low, slowly stream in the oil. Once it's all added, increase the speed to medium-high and beat for 2-3 minutes until the mixture is very light and creamy.
- Add the 4 egg yolks, one at a time, beating well after each addition. Scrape down the sides of the bowl.
- In a small bowl, whisk together the vanilla extract, white vinegar, buttermilk, and red gel food coloring until you have a uniform, vibrant red liquid.
- With the mixer on low, add the sifted dry ingredients in three additions, alternating with the red buttermilk mixture. Begin and end with the dry ingredients (Dry, Wet, Dry, Wet, Dry).
- My #1 Tip: Mix only until the last streak of flour is just combined. Do not overbeat! Scrape down the bowl and set it aside.
The "Velvet" Secret (Whip Egg Whites)
- In a separate, very clean, and dry bowl, use the whisk attachment (or clean beaters on your hand mixer) to beat the 4 egg whites on high speed until stiff peaks form. This means when you lift the whisk, the peak holds its shape and doesn't flop over.
- Gently fold about one-third of the whipped egg whites into the red velvet batter using a rubber spatula. This lightens the batter.
- Add the remaining egg whites and gently fold them in. Use a "cut and fold" motion, cutting through the middle of the batter and folding it over from the bottom, turning the bowl as you go. Stop as soon as you no longer see large streaks of egg white. You want to keep all that air you just whipped in!
Bake and Cool
- Divide the airy batter evenly between your two prepared cake pans.
- Bake for 30-35 minutes, or until a toothpick inserted in the center comes out with a few moist crumbs attached (not clean, which can mean it's over-baked).
- Let the cakes cool in their pans on a wire rack for 15 minutes. Then, run a thin knife around the edge and invert the cakes onto the wire rack to cool completely.
Make the Frosting and Assemble
- In a large bowl, beat the softened cream cheese and butter on medium-high speed until completely smooth and creamy (about 2-3 minutes).
- With the mixer on low, gradually add the sifted confectioners' sugar. Once it's mostly incorporated, add the vanilla and salt.
- Increase the speed to medium-high and beat for 2-3 minutes until the frosting is light, fluffy, and holds its shape. Do not overbeat, or it can become runny.
- To assemble, place one cooled cake layer on your stand or serving plate. Spread about 1.5 cups of frosting evenly over the top.
- Place the second cake layer, top-side down, on top of the frosting (this gives you a perfectly flat top).
- Cover the top and sides of the cake with the remaining frosting. You can create rustic swoops with an offset spatula or smooth the sides with a bench scraper.
- Refrigerate the cake for at least 30-60 minutes to set the frosting before slicing.
Notes
Cover the cake tightly with a cake dome or plastic wrap and store it in the refrigerator for up to 5 days. The fats in the cake and frosting require refrigeration. Serving Suggestions
This cake is best served at room temperature. The crumb is softer and the cream cheese flavor is more pronounced. I always pull the cake (or a single slice) from the fridge at least 1 hour before serving. Cupcakes: This recipe makes about 24-30 cupcakes. Fill liners 2/3 full and bake at 350°F for 18-22 minutes. Leftover Transformation Idea If you have any leftover cake (it's rare!), crumble it up and layer it in glasses with extra frosting, whipped cream, and maybe some fresh raspberries for a stunning and easy red velvet trifle. Troubleshooting Tips Why is my cake dry? You most likely over-baked it. Ovens vary! Start checking for doneness at the 30-minute mark. You want a toothpick with moist crumbs, not a perfectly clean one. Why is my frosting runny? Your cream cheese or butter was too warm (or you over-beat it). They should be softened to room temperature, but still cool to the touch. To fix it: Chill the entire bowl of frosting in the refrigerator for 20-30 minutes, then re-whip it on medium-high speed for a minute. Why did my cake sink in the middle? This could be from opening the oven door too early, which lets cold air in and deflates the batter. It could also be from under-baking. Recipe Notes (Substitutions, Make-Ahead, Scaling) Flour Substitution: For the most tender "velvet" cake, do not substitute the cake flour. In a pinch, you can make your own: For every 1 cup of all-purpose flour, remove 2 Tbsp, and add 2 Tbsp of cornstarch. Sift this mixture together 3-4 times before using. Make-Ahead: The cake layers can be baked, cooled completely, and wrapped tightly in plastic wrap. Store at room temperature for up to 2 days. The frosting can be made and stored in an airtight container in the fridge for up to 1 week. Let the frosting soften at room temperature for 15-20 minutes before whipping and frosting the cake. Scaling: This recipe can be halved to make one 9-inch layer, a small 6-inch two-layer cake, or about 12-15 cupcakes. Did you make this recipe? I'd love to see it! Tag @Grandmaws on Instagram and use the hashtag #UltimateVelvetCake !
Nutrition
Rate This Recipe
Share This Recipe With The Ones You Love!