Peanut butter pot roast is the kind of dish that stops people mid-sentence when they walk through your kitchen door — the rich, nutty aroma rising from the pot is unlike anything they have smelled before, and one bite of that velvety gravy over fork-tender beef will make them wonder why they have never heard of this.
I am going to walk you through every step of this recipe, from the sear to the slow braise, so that the first time you pull this roast out of the oven, it turns out exactly the way it should. If you have ever made a pot roast that was dry, bland, or had a gravy that tasted like nothing more than thin beef water, this is the one that fixes all of that. The peanut butter changes everything — it adds a richness and body to the braising liquid that butter and flour alone cannot touch. And if you think the combination sounds strange, I understand. I thought the same thing the first time my aunt set it on the table. Then I tasted it, and I never went back.
The Story Behind Peanut Butter Pot Roast
The first time I ever tasted peanut butter pot roast, it was at my Aunt Mable’s house on a cold Sunday in January. She was not the type to explain herself in the kitchen — she just cooked, and you either ate it or you did not. I watched her stir a big spoonful of peanut butter into the pot with the broth and onions, and I must have made a face, because she looked right at me and said, “Just wait.”
She was right. That roast was the best I had ever eaten, and the gravy was something I still think about. It had a depth and a smoothness that I could not figure out until I started making it myself. The peanut butter melts into the braising liquid and thickens it naturally, giving the gravy a velvety texture and a subtle nutty undertone that rounds out the beef flavor in a way that is hard to explain until you taste it.
This dish has roots in Southern resourcefulness. Peanuts have been a staple crop across the South for well over a century, and peanut butter found its way into more savory dishes than most people realize. It was never about being fancy — it was about using what was in the pantry to make something that fed a family well. This peanut butter pot roast carries that spirit, and it is the version I have been making for over thirty years. For more recipes and techniques rooted in this tradition, I keep a growing collection over at The Complete Guide to Southern Cooking: Techniques, Traditions & Time-Tested Wisdom.
What Makes This Peanut Butter Pot Roast Recipe Work
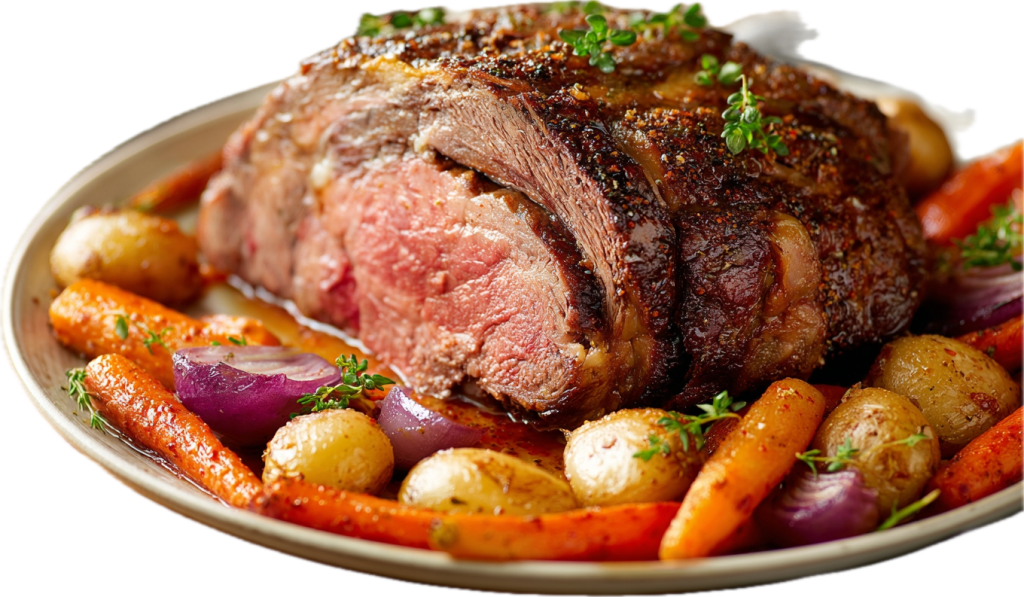
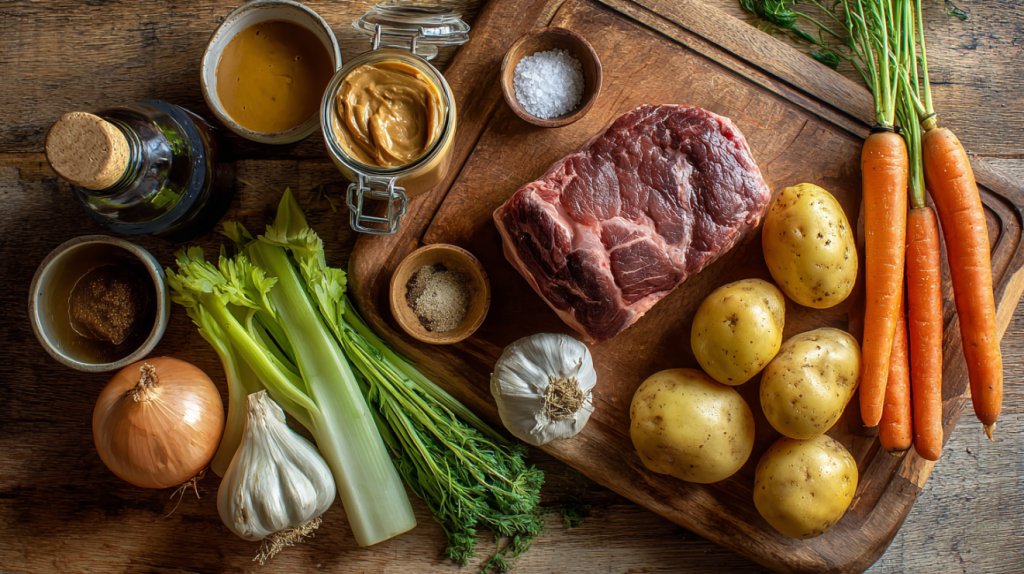
The chuck roast is the foundation, and there is no substitute for it. Chuck comes from the shoulder of the cow, which means it is loaded with connective tissue and intramuscular fat — exactly the things that break down during a long, slow braise and turn a tough cut into something you can pull apart with a fork. I have tried this with bottom round and eye of round, and both came out dry. Stick with chuck.
The peanut butter is the heart of this dish. Use a regular creamy peanut butter — the kind that comes in a jar and does not separate. Natural peanut butter, the kind where the oil sits on top, will not emulsify properly into the braising liquid. You will end up with an oily slick on the surface instead of a smooth gravy. A third of a cup is the right amount. It adds richness without making the dish taste like a peanut butter sandwich. The flavor is subtle and warm, and most people cannot even identify it until you tell them.
Rich Flavors To Add More Umani
The supporting players matter too. Worcestershire sauce brings a deep savory backbone. Tomato paste adds concentrated umami and a touch of sweetness. Apple cider vinegar cuts through the richness and keeps the whole thing balanced — without it, the gravy can taste flat and one-note. And the brown sugar is not there to make it sweet; it rounds out the acid and deepens the caramelized flavors from the sear. Every ingredient in this pot has a job to do, and I have spent years getting the balance right.
If you are interested in how building layers of flavor from the bottom of the pot up transforms a simple braise, I get into that philosophy in The Philosophy of Layering Flavor at Every Step — it is the same approach that makes this pot roast so much richer than a basic one.
Here is a quick substitution guide if you need to adjust:
- Beef broth — homemade stock is best, but a good quality store-bought low-sodium works. Avoid bouillon cubes, which are too salty and taste artificial.
- Apple cider vinegar — red wine vinegar works in a pinch, but skip balsamic; it is too sweet and changes the color.
- Bacon grease for searing — vegetable oil is fine, but if you have saved bacon grease, it adds another layer of flavor from the first moment. I keep a guide on that at How to Clean and Store Bacon Grease: Liquid Gold.
- Yukon Gold potatoes — red potatoes hold up well too. Russets will fall apart in the braise.
How to Make the Best Peanut Butter Pot Roast
This is where I stand beside you at the stove and walk you through every step. The recipe card gives you the bones of it, but this is where you learn what to watch for, what to listen for, and how to know — without a doubt — that things are going right.
Getting the Sear Right
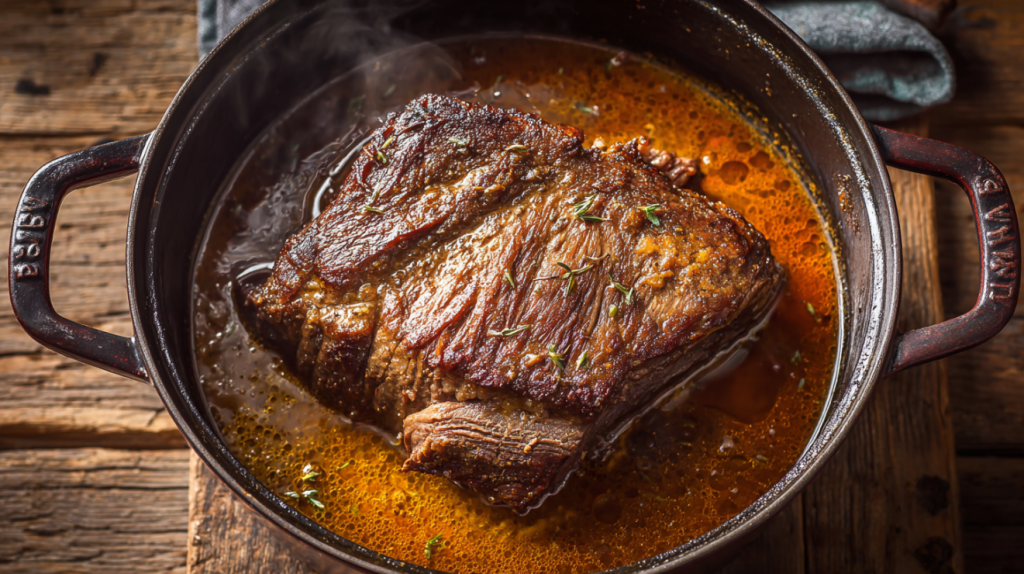
The sear is the single most important step in this whole recipe, and it is the one most people rush through. Take that roast out of the refrigerator, pat it bone-dry with paper towels — I mean really dry, press down on it — and season it well on every side. Then let it sit on the counter while you prep the onions, garlic, and vegetables. You want the surface of that meat as dry as possible before it touches the pan.
Heat your Dutch oven over medium-high heat. Add the oil or bacon grease and let it heat until it shimmers — you will see the surface of the oil ripple and move. Now lay that roast in the pot and do not touch it. I know it is tempting to check underneath, but leave it alone. You should hear a loud, steady sizzle the entire time. If the sizzle dies down, your pan was not hot enough. After four to five minutes, grab your tongs and lift one edge — you are looking for a deep, dark mahogany crust. Not light tan, not golden. Dark brown, almost the color of a pecan shell. Flip it and do the same on the other side and on the ends.
When you pull that roast out and set it on a plate, the bottom of the pot should have a layer of dark, stuck-on bits. That is called fond, and it is pure concentrated flavor. Do not scrape it off — we are about to build the whole gravy on top of it. If you want to go deeper on why that browning matters and how it works, I cover it in detail in The Maillard Reaction: How Browning Creates Flavor.
Building the Braising Liquid
Drop your heat to medium and add the diced onion right into that pot with all the fond. The onion will release moisture and start lifting those browned bits off the bottom — you help it along with a wooden spoon, scraping gently. Cook the onions for three to four minutes. They should soften and turn translucent, and the kitchen will start smelling savory and warm. Add the minced garlic and stir it in for just thirty seconds — garlic burns fast, and burnt garlic tastes bitter.
Now, in a separate bowl or a large measuring cup, whisk together the beef broth, water, peanut butter, Worcestershire sauce, tomato paste, apple cider vinegar, and brown sugar. Whisk it well — you want the peanut butter completely dissolved. It will look like a thin, tan-colored liquid. Pour the whole thing into the pot and stir it with the onions. The liquid will bubble up and start pulling the last of the fond off the bottom. It should smell rich, savory, and slightly nutty with a tang from the vinegar.
For guidance on safe minimum internal temperatures for braised beef, the USDA’s Safe Minimum Cooking Temperatures page is a reliable reference to keep bookmarked.
The Long, Slow Braise
Nestle the seared roast back into the liquid. The braising liquid should come about halfway up the sides of the meat — not submerged, not barely touching. If you need to add a splash more broth or water, do it now. Bring the liquid to a gentle simmer — you should see small, lazy bubbles breaking the surface, not a rolling boil. A hard boil will make the meat seize up and turn tough instead of tender.
Put the lid on tight and drop the heat to low. On my stove, low means the liquid barely moves — a bubble rising to the surface every few seconds. That is what you are after. If your stovetop runs hot, you can transfer the Dutch oven to a 300°F oven instead, which gives you more even, consistent heat. I go into this method more in Dutch Oven Cooking on the Stovetop: A Complete Guide.
After about an hour and fifteen minutes, lift the lid and turn the roast over. The top side will have been sitting above the liquid and it needs time in the braise too. Replace the lid and continue cooking. At the two-and-a-half-hour mark, check the meat. Press it gently with your tongs — it should give easily and feel like it is starting to want to fall apart, but it should still hold its shape. If it is still firm, give it another 20-30 minutes.
Adding the Vegetables and Finishing
Once the roast is tender, tuck the quartered potatoes, carrot pieces, and celery around the meat. Push them down into the liquid as much as you can. Replace the lid and cook for another 45 minutes to an hour. The potatoes are done when a fork slides through them with no resistance, and the carrots should be tender but not mushy.
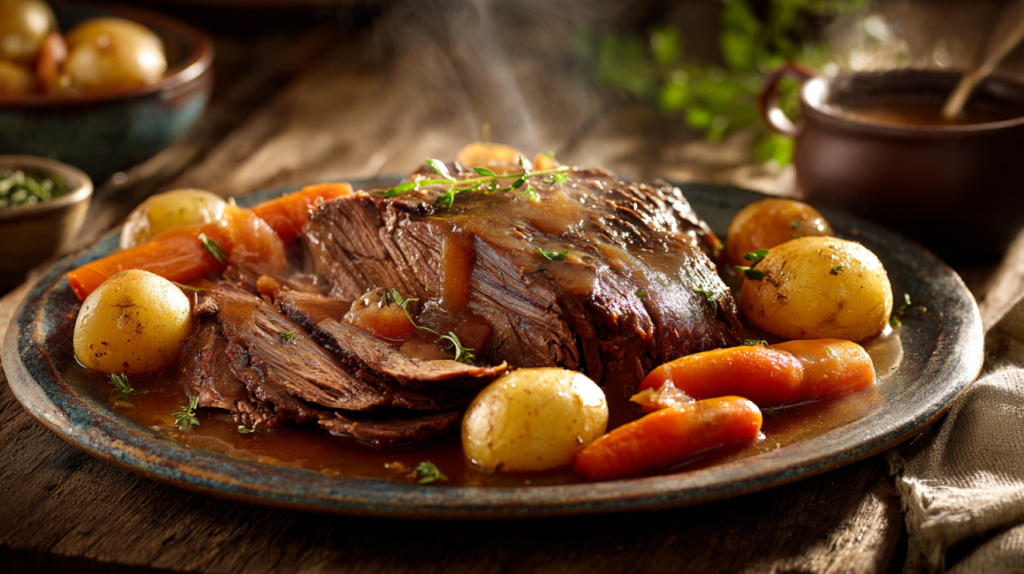
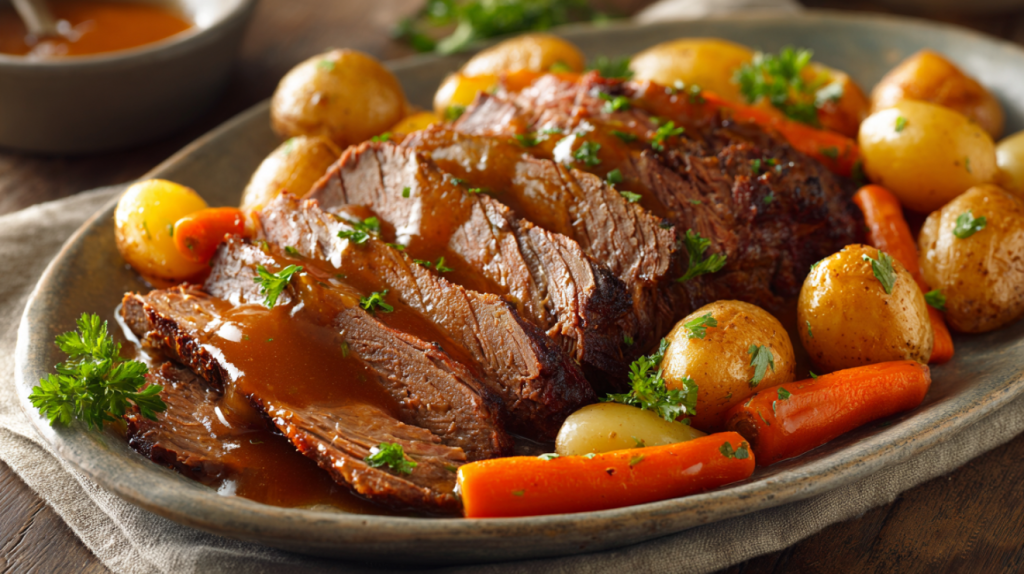
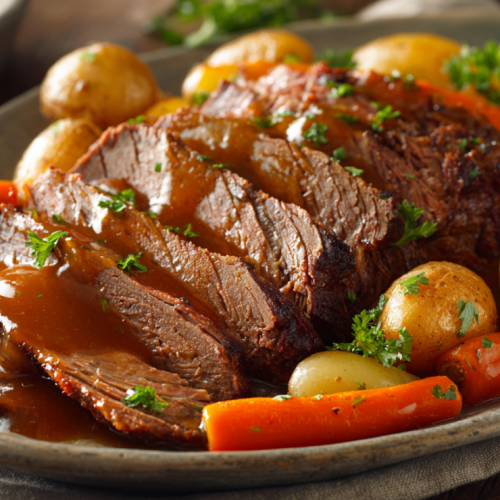
Carefully transfer the roast and vegetables to a serving platter. Now taste that gravy. It should be rich, deeply savory, smooth, and with a subtle nutty warmth in the background. If it tastes flat, add a pinch more salt. When pot roast tastes too rich, a small splash of apple cider vinegar will brighten it right up. If the gravy is thinner than you like, let it simmer uncovered for 10 minutes to reduce and concentrate.
Slice the roast or pull it apart into generous portions. Spoon the peanut butter gravy over everything — do not be shy with it. That gravy is the whole reason people will be asking for this recipe.
What to Serve with Peanut Butter Pot Roast
This roast is a full plate on its own — the meat, the potatoes, the carrots, and all that gravy. But if you want to round out the table, a simple green vegetable brings balance. Steamed green beans dressed with a little butter and salt work beautifully, or a mess of collard greens cooked low and slow with a ham hock. The bitterness of the greens plays off the richness of the peanut butter gravy in a way that just makes sense.
Good bread is almost required. A pan of hot cornbread or a batch of buttermilk biscuits gives you something to sop up that gravy with, and that is not a step you want to skip. I always set out a dish of soft butter alongside.
This is a Sunday dinner dish through and through, but it also holds its own at a holiday table, a potluck, or any time you need a meal that feeds a crowd without a lot of last-minute fuss. The roast does its work in the pot while you tend to everything else.
Flavor Variations to Try
Spicy Peanut Pot Roast
Add a teaspoon of cayenne pepper to the seasoning rub and stir a tablespoon of sriracha or sambal oelek into the braising liquid with the peanut butter. The heat builds slowly during the long braise and gives the gravy a warm kick that pairs especially well with the nutty sweetness. My nephew requests this version every time he visits.
Peanut Butter and Mushroom Pot Roast
Add a pound of sliced cremini mushrooms to the pot after searing the roast. They cook down into the braising liquid and add an earthy, meaty depth that makes the gravy even more complex. The mushrooms practically melt into the sauce by the end.
Asian-Inspired Peanut Pot Roast
Replace the Worcestershire sauce with soy sauce, swap the apple cider vinegar for rice vinegar, and add a tablespoon of fresh grated ginger to the braising liquid. Finish with a squeeze of lime and some sliced green onions. It is a different direction entirely, but it works beautifully with that peanut butter base. Serve it over rice instead of with potatoes.
Sweet Potato Peanut Pot Roast
Swap the Yukon Gold potatoes for cubed sweet potatoes. The natural sweetness of the sweet potatoes blends into the peanut butter gravy and creates a warmer, slightly sweeter flavor profile. This is the version I make in the fall when sweet potatoes are coming out of the garden.
How to Store, Reheat, and Make This Ahead
This pot roast stores beautifully and, truthfully, tastes better the next day. Once it has cooled to room temperature, transfer the meat and vegetables to an airtight container and pour the gravy over the top. It will keep in the refrigerator for four to five days. The fat from the gravy will solidify on the surface overnight — you can lift it right off if you prefer a leaner gravy, or stir it back in for the full richness.
To reheat, put the roast and gravy in a covered pot over low heat on the stove, stirring gently now and then. Add a splash of beef broth or water if the gravy has thickened too much. The microwave works in a pinch, but the stovetop gives you more control and keeps the meat from drying out at the edges.
For make-ahead meals, you can braise the roast and store it in the gravy a full day before you need it. Reheat it low and slow and cook the vegetables fresh when you are ready to serve — they hold their texture better that way than reheated ones do.
This roast freezes well for up to three months. Store the sliced or pulled meat in the gravy in freezer-safe containers. Thaw overnight in the refrigerator and reheat on the stove. The gravy may look slightly separated after freezing, but a good stir over low heat brings it right back together. I cover the best methods for freezing braised meats in How to Freeze and Reheat Soups, Stews & Broths the Right Way.
What to Do with Leftover Peanut Butter Pot Roast
Peanut Pot Roast Sandwiches
Pile shredded leftover roast onto a toasted hoagie roll, spoon warm peanut butter gravy over the top, and add a few pickled jalapeños if you want a kick. The gravy soaks into the bread the way good au jus does, and the nutty richness makes it something far better than a typical leftover sandwich.
Pot Roast Hash
Chop the leftover meat and potatoes into rough cubes and fry them in a cast iron skillet with a little butter until the edges get crispy and golden. Top each portion with a fried egg and a spoonful of the reheated gravy. This is one of the best breakfasts I know.
Peanut Butter Pot Roast Tacos
Shred the meat and warm it in the gravy. Pile it into warm flour tortillas with a quick slaw of shredded cabbage dressed in lime juice and a drizzle of sriracha. The peanut butter gravy and the bright, crunchy slaw are a combination that works better than you would expect.
Pot Roast Fried Rice
Dice the leftover meat and vegetables and stir-fry them with day-old rice, a splash of soy sauce, and a beaten egg. The peanut butter flavor that clings to the meat gives the fried rice a warmth and depth that plain leftover beef cannot match.
Peanut Butter Pot Roast
Equipment
- Dutch Oven or Heavy Lidded Pot
- Cast Iron Skillet (optional, for searing)
- Tongs
- Wooden Spoon
- Meat Thermometer
Ingredients
The Roast
- 3.5 lb chuck roast bone-in or boneless
- 1.5 tsp kosher salt
- 1 tsp black pepper freshly ground
- 1 tsp garlic powder
- 0.5 tsp smoked paprika
- 2 tbsp vegetable oil or bacon grease
The Braising Liquid and Gravy
- 1 cup yellow onion diced
- 3 garlic cloves minced
- 2 cup beef broth
- 1 cup water
- 0.33 cup creamy peanut butter not natural-style
- 2 tbsp Worcestershire sauce
- 1 tbsp tomato paste
- 1 tbsp apple cider vinegar
- 1 tbsp brown sugar
The Vegetables
- 1.5 lb Yukon Gold potatoes quartered
- 4 carrots cut into 2-inch pieces
- 2 celery stalks cut into 2-inch pieces
Instructions
Prepare and Sear the Roast
- Pat the chuck roast dry with paper towels. Mix salt, pepper, garlic powder, and smoked paprika together and season the roast generously on all sides. Let it sit at room temperature for 15-20 minutes while you prep the vegetables.
- Heat vegetable oil or bacon grease in a Dutch oven over medium-high heat until the oil shimmers. Sear the roast for 4-5 minutes per side until a deep brown crust forms. Remove the roast and set aside.
Build the Braising Liquid
- Reduce heat to medium. Add diced onion to the pot and cook for 3-4 minutes, scraping up the browned bits from the bottom. Add minced garlic and cook for 30 seconds until fragrant.
- Whisk together beef broth, water, peanut butter, Worcestershire sauce, tomato paste, apple cider vinegar, and brown sugar until the peanut butter is fully dissolved. Pour the mixture into the pot with the onions.
Braise the Roast
- Return the roast to the pot, nestling it into the liquid. The liquid should come about halfway up the roast. Bring to a gentle simmer, then cover with a tight-fitting lid and reduce heat to low.
- Braise for 2.5 hours, turning the roast once halfway through. The meat should be getting very tender but not quite falling apart yet.
Add Vegetables and Finish
- Tuck the quartered potatoes, carrots, and celery around the roast. Replace the lid and cook for an additional 45 minutes to 1 hour, until the vegetables are fork-tender and the meat pulls apart easily with a fork.
- Remove the roast and vegetables to a serving platter. Skim any excess fat from the surface of the gravy. Taste the gravy and adjust salt, pepper, or a splash of vinegar as needed. The gravy should be rich, velvety, and slightly nutty.
- Slice or pull the roast apart into portions. Spoon the peanut butter gravy generously over the meat and vegetables. Serve immediately.
Nutrition
Rate This Recipe
Share This Recipe With The Ones You Love!Everything You Need to Know About Peanut Butter Pot Roast
Does peanut butter pot roast actually taste like peanut butter?
Not in the way you are thinking. The peanut butter melts into the braising liquid over several hours and becomes part of the gravy. The flavor it adds is a subtle, warm nuttiness and a rich, smooth body — not a peanut butter sandwich taste. Most people cannot identify it until you tell them what it is.
What cut of beef is best for peanut butter pot roast?
Chuck roast, every time. It has the right amount of fat and connective tissue to break down during a long braise and become fork-tender. Leaner cuts like eye of round or top round will dry out, even in all that liquid. If your butcher has a bone-in chuck, grab it — the bone adds extra richness to the gravy.
Can I make peanut butter pot roast in a slow cooker?
You can, but sear the roast on the stove first — you need that crust for flavor. After searing, transfer the roast to the slow cooker, pour the braising liquid over it, and cook on low for 8-10 hours or high for 5-6 hours. Add the vegetables during the last 2 hours on low or the last hour on high so they do not turn to mush.
Is this recipe safe for people with peanut allergies?
No. This recipe contains real peanut butter, and it is not safe for anyone with a peanut allergy. There is no suitable nut-free substitute that achieves the same effect in this particular dish. Always let your guests know what is in the gravy. The Food Allergen Labeling and Consumer Protection Act overview from the FDA provides useful guidance on allergen awareness.
How do I thicken the gravy if it is too thin?
Remove the lid during the last 20-30 minutes of cooking and let the liquid reduce. The peanut butter naturally thickens the gravy as it concentrates. If you need more body after that, whisk a tablespoon of cornstarch into two tablespoons of cold water and stir it into the simmering gravy. It will thicken within a minute or two.
Can I use crunchy peanut butter instead of creamy?
I would not recommend it. Crunchy peanut butter leaves small peanut pieces in the gravy that do not break down during cooking. The gravy should be smooth and velvety. If you like a bit of texture, sprinkle a few crushed roasted peanuts over the finished dish as a garnish instead.
How long does peanut butter pot roast take to cook?
Plan on about four hours and twenty minutes total, including searing and resting. The roast braises for about three and a half hours — two and a half for the meat and another 45 minutes to an hour after adding the vegetables. You cannot rush a pot roast. Low heat and patience are the only way to get meat that falls apart.
Make This the Pot Roast They Talk About
There are a hundred pot roast recipes out there, and most of them taste about the same. This peanut butter pot roast is different. It has a richness and a depth that people notice from the first bite, and the gravy alone is worth making the whole dish. Once you see that thick, velvety sauce coat the back of a spoon and taste the way the peanut butter rounds out every other flavor in the pot, you will understand why this is the version I keep coming back to after thirty years.
Make it this Sunday. Take your time with the sear, keep the braise low and gentle, and let the peanut butter do what it does best. When your family gathers around the table and you set that platter down, you will see it on their faces before they even take the first bite. And when you are done, I hope you will come back and tell me how it turned out — that is my favorite part of sharing these recipes.