In the mountains, you learned not to waste a thing. For generations, “making do” meant your food came from the garden, the forest floor, and the woods. Hunting wasn’t a sport; it was a way to put a hot, filling meal on the table. This is why you’ll find traditions of cooking wild game, like possum and raccoon, running so deep in Southern & Appalachian heritage.
Now, I know for a lot of folks, the very idea of this is a bit of a challenge. You’ve probably heard it’s tough, or that it has a strong, “gamey” taste. And I’ll be honest with you—if it’s not prepared right, it surely can be. I’ve had game that was tough as a boot sole and tasted like the mud it walked through. I’ve also had it prepared right, in a rich, slow-cooked stew, where it was as tender and flavorful as any pot roast.
The difference, every single time, is in the preparation.
The secret to good, tender wild game isn’t in a fancy recipe. It’s in the hard-won, generational knowledge of how to handle it. The key to a good possum stew starts long before the pot is on the fire; it starts with the raw possum meat itself. This isn’t a quick process, and it’s not for the faint of heart, but it is the only way to do it right according to people from all of the many souths.
This is not a 30-minute meal. This is an all-day (or two-day) process that honors the animal and ensures a safe, delicious, and nourishing meal for your family. I am going to walk you through everything—the old-time, necessary steps for safely cleaning, soaking, and tenderizing this game. This is the wisdom that separates a tough, gamy piece of meat from a respectable, nourishing meal. We’ll cover the why behind each step, because knowing that is what makes it stick.
A Critical Word on Safety: The Unspoken Rules of Wild Game
This is the most important part, and I can’t stress this enough. Before we talk about trimming or soaking, we have to talk about safety. This isn’t like buying a chicken from the store. You are handling a wild animal, and that comes with risks you have to manage.
Know Your Source: The First, Most Critical Step
This is rule number one. You must be 100% certain of where your game came from. A wild animal is a product of its environment. You are looking for an animal that lived in a clean, natural, “wild” area, far from human garbage, landfills, or contaminated water.
An animal that has been eating trash will taste like it, and it’s at a much higher risk for carrying diseases. Possums, in particular, are opportunistic and will eat anything. This is why old-timers would sometimes trap a possum and “feed it out” for a week or two on corn and clean water to “clean its system.” While that’s a different process, the principle is the same: you want a “clean” animal.
Before you even begin, inspect the animal. Does it look healthy? Is its fur in good condition? Are there any obvious sores, tumors, boils, or signs of sickness? Is the liver (when dressing) spotty or discolored? If anything looks “off,” do not eat it. The old saying is, “When in doubt, throw it out.” It is not worth the risk.
The Dangers of Contamination (And How to Prevent Them)
Wild game can carry bacteria and parasites that are serious business. You may have heard of trichinosis, which can be found in animals like bears and, less commonly, in raccoons and possums that have eaten other infected animals. There’s also tularemia (mostly in rabbits), leptospirosis, and other bacteria.
This is not to scare you; it’s to make you respectful. The good news is that these risks can be almost completely eliminated with two things:
- Proper handling in the kitchen.
- Cooking the meat to a safe internal temperature.
According to the USDA guidelines for wild game safety , you should always cook wild game like possum meat and raccoon meat to an internal temperature of at least 165°F. There is no “medium rare” in this kind of cooking. You are cooking for safety and tenderness, which means a long, slow cook that will go well past this temperature anyway. A meat thermometer is your best friend.
Kitchen Hygiene: A Step-by-Step Process
 This is where you have to be meticulous. Assume the raw meat is contaminated and act accordingly.
- Use a Dedicated Surface: Do not clean a wild animal on your wooden cutting board. Ever. Use a non-porous surface, like a large plastic cutting board, that can be bleached. Some folks will even do the initial trimming on a clean piece of plastic or a board set over the sink, or even outside on a dedicated table.
- Wear Gloves: This is not optional. Wear disposable latex or nitrile gloves. This protects you from any bacteria on the animal, and it protects the meat from you. Change them if they tear.
- Control the Mess: Keep the raw meat and its juices contained. Don’t let it touch your counters, your sink faucet, your cabinet handles, or any other food.
- The Two-Step Cleanup: This is critical.
- Step 1: Clean. Wash your cutting board, knives, and sink with hot, soapy water.
- Step 2: Sanitize. After washing, you must sanitize. A weak bleach solution (about 1 tablespoon of unscented bleach per gallon of water) is your best friend. Wipe down your board, your knives, your sink, your faucet, and your countertops. Let it air dry.
- Wash Your Hands: Even though you wore gloves, wash your hands thoroughly with hot, soapy water for at least 20 seconds after you’ve finished and cleaned up.
The Art of Field Dressing (If You’re the Hunter)
If you are the one who hunted the animal, the preparation starts in the field. The goal is to cool the meat down as quickly as possible to prevent bacteria from growing. This is done by removing the internal organs (the “viscera”) immediately.
This is a skill unto itself, but the principle is simple.
- Position the animal: Place it on its back.
- Make the cut: Using a sharp, clean knife, make a shallow incision through the skin and muscle of the belly, from the breastbone down to the pelvis. Be very careful not to puncture the intestines or bladder.
- Cut around the anus: Deepen the cut around the anus to free the lower intestine.
- Reach in: Reach into the body cavity, up toward the chest, and cut the diaphragm (the membrane separating the chest from the abdomen).
- Remove: Grasp the organs (lungs, heart, liver, intestines) and pull them out. You may need to cut the windpipe to free them completely.
- Drain and Cool: Turn the animal over to drain any blood. In cold weather, you can prop it open to cool. In warmer weather, you must get it into a cooler with ice or back to a refrigerator immediately.
For most of us, we’re starting with an animal that is already dressed but still has its skin on. The next step is skinning, which is a process that takes practice. Once the skin is off, you are ready for the critical kitchen prep.
Tools for the Job: What You’ll Need
Before you bring that meat into your kitchen, get your tools ready.
- A Large, Non-Porous Cutting Board: Again, this is not for your wooden board.
- Disposable Gloves: A must-have.
- A Very Sharp Boning Knife: A small, sharp, flexible knife is essential for trimming fat and removing glands.
- A Heavier Knife or Cleaver: Useful for breaking down the carcass into manageable pieces (e.g., separating the legs and back).
- A Large, Non-Reactive Bowl: This means glass, stainless steel, or food-grade ceramic. Do not use aluminum, as the salt and acid in your soak will react with it.
- A “Trash” Bowl: A separate bowl for all the fat, glands, and trimmings. This keeps your cutting board clean.
- Bleach and Cleaning Supplies: For the mandatory cleanup.
The Critical First Prep: Cleaning and Soaking
This is where the flavor is made or broken. You are about to do two things: remove the parts that taste bad, and soak the meat to make it taste good.
A Detailed Guide to Trimming Fat
Wild animal fat is not like the flavorful, white fat on a hog or a beef cow. It is often yellow or waxy, and it holds the strongest “gamey” flavor. For possums and raccoons, it’s non-negotiable: you must trim away every bit of fat you can see.
- What it looks like: Possum fat is often a thick, waxy, yellow-ish layer right under the skin. Raccoon fat is similar. It’s slippery and dense.
- The Process: Put on your gloves. Use your sharp, small knife. Pull the fat away from the muscle with one hand and slice it off with the knife in your other hand. Be patient. This is not a fast job. You are trying to get down to the lean, dark muscle. This will take time, but it is the most important step for flavor.
- Check Every Nook: Pay special attention to the area along the backbone, deep in the hip joints, and around the shoulders. Fat hides everywhere.
Finding and Removing Every Musk Gland
The second part of the trimming process is removing the musk glands. These are small, waxy-looking, bean-shaped or pea-sized “kernels” of tissue. They are not fat. They are dense, grayish or waxy, and have a different texture. If you leave even one of these in, it will release a bitter, musky, awful taste into your entire pot.
Their locations are predictable:
- Under the front legs (“armpits”): This is the most common spot. You’ll feel them embedded in the muscle and connective tissue.
- On the back, near the base of the hind legs: Feel along the backbone and down toward the hindquarters.
- In the neck and shoulder area: Sometimes smaller glands are found here.
Use your gloved fingers to feel for these little “kernels.” They feel different from the surrounding meat—harder, like a small bean. When you find one, use the tip of your knife to carefully cut it out whole. Be careful not to slice into it. You want to remove it cleanly and discard it in your trash bowl.
Breaking Down the Carcass
After trimming, break the animal into serving pieces. For a stew, this means separating the hind legs, the front shoulders, and the back. The back (or “saddle”) can be cut into 2-3 pieces. This makes it easier to soak and cook.
The Soaking Solution: A Deeper Dive
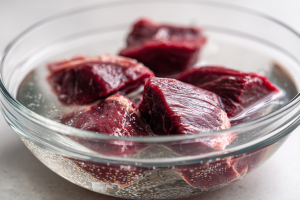 Once your possum meat is trimmed of all fat and glands, and cut into pieces, you must soak it. This is the old-timer’s secret to making it palatable. Soaking draws out any remaining blood and pulls that last bit of “gamey” flavor from the muscle itself.
You have a few options for your soak, and different families swear by different methods.
- Salt Water (The Classic): This is the most common method. Fill your large, non-reactive bowl with cold water. Stir in a good bit of salt—about 1/4 cup of plain salt per gallon of water. The salt helps draw moisture and blood out of the meat through osmosis.
- Vinegar Water: Add a healthy splash of white vinegar (maybe 1/2 cup per gallon) to your cold water. The acid works to clean the meat and break down some of the gamey flavor.
- Salt-and-Vinegar Combo: This is my preferred method. A gallon of water, 1/4 cup of salt, and 1/4 cup of white vinegar. It does both jobs.
Submerge the meat pieces in your chosen solution. Make sure they are all under the water. Cover the bowl and put it in the icebox (refrigerator). Let it soak for at least 12 hours, or up to a full 24 hours.
Crucial Step: For a long soak, you must change the water. After about 12 hours, drain the cloudy, discolored water, rinse the meat, and put it back in the bowl with a fresh batch of your soaking solution. This is not optional.
The Secret to Tenderness: Parboiling and Low Heat
After soaking, drain the meat and rinse it well. You’ve solved the flavor problem. Now you have to solve the toughness problem.
A wild animal uses its muscles. That means the meat is full of lean muscle and tough connective tissue (collagen). If you try to fry this meat fast, that collagen will seize up, and you’ll be chewing for an hour. The only way to make it tender is with moisture and time.
The “Why” of Parboiling
Many old-timers, myself included, will “parboil” the meat before ever starting the “real” recipe. This is a pre-boil that serves a few purposes:
- Renders Last Bits of Fat: It melts away any tiny bits of fat you may have missed.
- Removes Impurities: It brings any remaining blood or “scum” to the surface, where you can discard it.
- Gives a Head Start: It’s the first step in that long, slow cooking process.
To parboil, place your soaked, rinsed meat pieces in a large stockpot. Cover them with fresh, cold water (do not use the soaking liquid). You can add a halved onion, a few bay leaves, and a tablespoon of vinegar to this water to help with flavor.
Bring the pot to a boil, then reduce it to a hard simmer. Let it cook for a good 30 minutes to an hour. You’ll see a foamy “scum” rise to the top. Skim this off as it forms.
When it’s done, drain the meat in a colander, discard all of that cooking water, and give the meat a good rinse. Now, and only now, is your possum meat ready to be cooked.
The Low-and-Slow Philosophy
 Your meat is now clean, free of gamy flavor, and has had its first boil. It’s ready for the pot.
The secret to tenderness is turning that tough collagen into rich, silky gelatin. And that only happens with a long, slow, moist-heat cook. This is why stewing is the most traditional way to cook possum meat.
You’ll put the parboiled meat in a pot with broth, water, and your seasonings, and let it simmer gently (not a rolling boil) for a long, long time—often two, three, or even four hours. You’re not cooking to a temperature; you’re cooking until the meat is falling-off-the-bone tender.
A pressure cooker is a modern tool that can speed this up, turning a 3-hour simmer into a 45-minute one. It’s a great option if you have one. A slow cooker (like a Crock-Pot) is also perfect for this.
An Appalachian Bestiary: Notes on Other Game
This same philosophy applies to other small game, with a few small changes.
Preparing Raccoon
Raccoon meat is typically darker, denser, and richer than possum meat. The preparation is identical. The fat must be trimmed, the glands must be removed, and it must be soaked and parboiled. Raccoon meat holds up wonderfully to a long, slow-roast, often with barbecue sauce, after it has been parboiled to tenderness.
Preparing Squirrel
Squirrel is a different animal altogether. It’s much milder and leaner. It’s considered a real delicacy by many.
- Glands: It has small glands, just like the others (under the legs, on the back) that you should remove.
- Fat: There isn’t much fat to trim.
- Soaking: A salt-water or buttermilk soak for a few hours is nice, but it doesn’t need the 24-hour soak.
- Cooking: Squirrel is famously tough. The classic way to cook it is to first roll the pieces in seasoned flour and fry them in a skillet until golden brown. Then, you add water or broth to the skillet, cover it tightly, and let it simmer for an-hour-and-a-half or two hours until it’s tender, making its own gravy.
Preparing Rabbit
Wild rabbit is incredibly lean and will dry out in a heartbeat.
- Glands/Fat: Very little to worry about here, though you should still inspect it.
- Soaking: A soak in buttermilk is the classic method, as it tenderizes and adds a bit of fat and flavor.
- Cooking: Rabbit is best when “larded” (wrapped in bacon) and roasted, or, more commonly, stewed. Like squirrel, it’s often fried first and then simmered. Handle it with care, as it’s a key animal in the spread of Tularemia, according to the CDC. Always wear gloves when handling rabbit and be sure to cook it thoroughly.
Troubleshooting: Common Mistakes and How to Fix Them
- “My meat is still tough!” You didn’t cook it long enough. It’s that simple. With this kind of meat, “tough” just means “not done.” Put the lid back on and let it keep simmering. It will get tender.
- “My meat still tastes ‘gamey’ or ‘muddy’!” You probably-skipped a step. Did you trim all the fat? Did you find all the glands? Did you soak it long enough and change the water? Did you parboil it and discard the water? You can’t take shortcuts with this.
- “My meat is dry!” This is rare with a stew, but if you’re roasting, it means you didn’t have enough liquid in the pan, or your heat was too high. Low and slow with moisture is the only way.
From Prep to Plate: Traditional Cooking Methods
After all this preparation, you have a meat that is clean-tasting, safe, and ready to take on flavor.
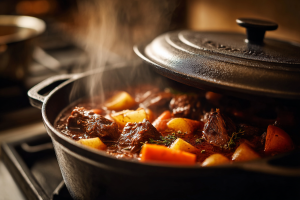
- The Perfect Wild Game Stew: This is, by far, the best and most traditional method. The meat simmers with hearty root vegetables (potatoes, carrots, onions), bay leaves, and good seasonings until it creates its own rich gravy. This long, moist-heat cook time is what guarantees tenderness. All the prep we just went over is the only way you’ll get a good result in our time-honored Possum Stew recipe. That recipe will walk you through turning your properly prepared meat into a delicious, hearty stew that’s a true taste of Southern & Appalachian history.
- Slow Roasting in a Dutch Oven: After parboiling, you can brown the meat pieces in a hot Dutch oven, then add your liquid (broth, a little wine, or water), onions, and garlic. Cover it tightly and put it in a low oven (300°F) for 3-4 hours until tender.
- Barbecuing (Raccoon): Raccoon is especially good for this. After parboiling the meat until it’s nearly tender, drain it, pat it dry, and put it in a roasting pan. Slather it with your favorite barbecue sauce and roast it at 350°F for an hour, basting it, until the sauce is caramelized.
This food is a key part of The Many Souths: A Complete Guide to America’s Regional Cuisines.
What to Serve With It: The Rest of the Plate
You don’t serve a meal like this by itself. It’s a hearty, humble food that calls for the same.
- Cornbread: This is non-negotiable. You need a crusty, hot skillet of cornbread for sopping up the gravy.
- Greens: A long-simmered “mess” of greens, like collards or turnips (cooked with a little fatback), is the perfect bitter, rich companion.
- Sweet Potatoes: Especially with possum, roasted sweet potatoes are a classic pairing. The sweetness of the potato plays perfectly with the rich meat.
It’s All in the Preparation
Cooking traditional game like possum meat isn’t about fancy ingredients. It’s not about being a gourmet chef. It’s about time, patience, and a deep respect for the animal and for your own health.
The old ways of cleaning, trimming, soaking, and parboiling were developed for a reason—they work. They are the hard-won wisdom of people who couldn’t afford to be wasteful or to get sick.
It’s a testament to the resourcefulness of our grandparents, who knew how to turn whatever the land provided into a safe, warm, and filling meal for their family. It’s not fast food, and it’s not for everyone, but it is a true taste of real southern and mountain history. And when it’s done right, it’s a meal you can be proud to serve.