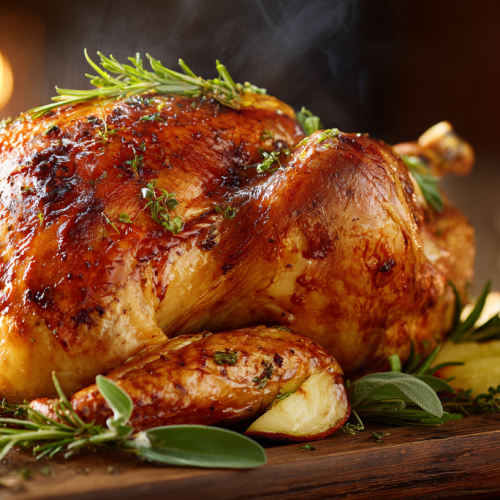
This time-honored Oven Roasted Turkey Recipe eliminates the fear of a dry bird by using a secret two-day brining process.
By combining a flavor-infused vegetable stock brine with a high-heat roasting start, you are guaranteed a centerpiece with impossibly crisp skin and meat so juicy it requires no gravy. This show-stopping main course deserves a sweet finish, so be sure to save room for a slice of Old-Fashioned Pecan Pie.
There’s a certain quiet panic that can settle in the heart of a home cook when faced with a holiday turkey. The fear is always the same: spending all that time and effort only to present a dry, lackluster bird at the center of the table. It’s a worry that has been passed down through generations.
I’m here to tell you, with the warmth and certainty of my own grandmother’s kitchen, that it doesn’t have to be that way. This oven roasted turkey recipe is more than just a set of instructions; it’s a promise. A promise of a bird so moist and flavorful, with skin so impossibly crisp, that it will become the centerpiece of your family’s Thanksgiving and Christmas memories for years to come.
My Time-Tested Oven Roasted Turkey Recipe
For decades, this method has been the heart of my holiday table. It’s not about fancy, complicated techniques. It’s about patience, a little bit of planning, and understanding the ‘why’ behind each step. The secret, as my mother always said, isn’t in one single thing, but in how all the little things come together. From the fragrant, flavor-infusing brine to the crucial resting period after it comes out of the oven, every step has a purpose. We’re not just cooking; we’re building layers of flavor and ensuring that every single bite is as juicy as the last.
Why This Turkey Recipe Will Become Your Go-To
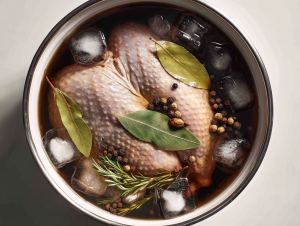
What makes this turkey recipe stand out from the rest is the two-day preparation process that guarantees success. The most important part of this journey is the brine. Soaking the turkey in a seasoned, aromatic saltwater solution does something magical.
It’s a process called osmosis, where the turkey absorbs the liquid, seasoning the meat from the inside out and ensuring it stays incredibly moist during the long roasting time. This isn’t just a suggestion; it’s the foundational secret to a perfect bird. The champagne and aromatics we add later are just the final touches of grace on an already wonderful foundation.
Gathering Your Ingredients: A Note on Quality
Before we begin, a quick word on your ingredients. A recipe is only as good as the things you put into it. Use a good, sturdy vegetable stock for your brine, and don’t be shy with the fresh herbs. They make all the difference.
Insider Secret: The Candied Ginger
A small but mighty ingredient in the brine is the chopped candied ginger. It might seem unusual, but it provides a subtle, warm sweetness and a hint of spice that cuts through the richness of the turkey. It’s a little secret that adds an incredible depth of flavor you just can’t quite put your finger on, but you’d miss it if it were gone.
Step-by-Step Guide to the Perfect Oven Roasted Turkey Recipe
Let’s walk through this together. Don’t rush. The turkey will tell you what it needs if you pay attention.
The Brine: Where the Magic Begins
First, we make our brine. In a large stockpot, you’ll combine your vegetable stock, salt, brown sugar, and all those beautiful spices. Bringing it to a boil just helps everything dissolve and marry together. The most important part of this step? You must let it cool completely—first to room temperature, and then in the refrigerator. Adding a warm brine to a cold bird is a recipe for disaster and is not safe.
The Overnight Soak
Once your brine is chilled, combine it with the iced water in a large, food-safe container. A 5-gallon bucket works wonders. After rinsing your turkey and removing the giblets (save them for our family’s favorite giblet gravy recipe), submerge it in the brine.
It will want to float, so you may need to weigh it down with a heavy plate. Let it rest in the refrigerator for at least 8 hours, but no more than 16.
Preparation for Roasting The next day, it’s time to roast. Take the turkey out of the brine and rinse it well, inside and out. Now, for what I believe is the second most important step: pat it completely dry with paper towels. A dry surface is the only way to get that shatteringly crisp skin we all love.
Flavoring the Bird Gently separate the skin from the breast meat with your fingers and push softened butter underneath. This bastes the meat as it cooks. We’ll also stuff the cavity with aromatics—apple, onion, cinnamon, and herbs. These don’t just flavor the bird; they release steam, helping to keep the meat moist from the inside.
Pro-Tip: The High-Heat Searing Method
Many recipes call for a low-and-slow roast from start to finish. I prefer to start the turkey in a blazing hot 500°F oven for the first 30 minutes. This does two things: it immediately starts rendering the fat in the skin, creating a super crispy texture, and it locks in the juices. After 30 minutes, we reduce the heat to 350°F to let the inside cook through gently without burning the exterior.
Common Mistakes to Avoid
- Improper Thawing: A partially frozen turkey will cook unevenly. Always allow several days for it to thaw safely in the refrigerator. A good rule of thumb is one day for every four pounds.
- Skipping the Brine: I know it takes extra time, but this is the single best way to ensure a juicy bird. Skipping it is the most common reason for a dry turkey.
- Forgetting to Rest the Turkey: When the turkey comes out of the oven, the juices are roiling. If you carve it immediately, all that moisture will end up on the cutting board. Letting it rest for 20-30 minutes allows the juices to redistribute back into the meat, which is essential. For more on safe food handling, you can always check the USDA guidelines for safe poultry temperatures.
Reheating
To prevent the meat from drying out, the best way to reheat turkey is in the oven. Place the desired amount in an oven-safe dish with a splash of chicken or turkey broth. Cover tightly with foil and heat at 325°F for about 20-30 minutes, or until the turkey is warmed through (reaches an internal temperature of 165°F). Smaller portions can be reheated in the microwave, but be careful not to overcook.
Make Ahead
The nature of this recipe is built around making it ahead. The brine can be made up to 3 days in advance and stored in the refrigerator. The spice rub can also be mixed and stored in an airtight container at room temperature for weeks. The turkey must be thawed and brined in the days leading up to roasting, but for the best quality and safety, the final roasting should be done on the day of serving.
Substitutions
Champagne: If you don’t have Champagne, you can substitute it with a dry white wine like Sauvignon Blanc, or use an equal amount of chicken or turkey broth for a non-alcoholic version.
Brine Aromatics: Feel free to swap the allspice and ginger for other whole spices like cloves, star anise, or juniper berries.
Cavity Aromatics: Instead of apples and onions, you can use lemons and oranges, or classic aromatics like carrots and celery to stuff the cavity.
Troubleshooting
- Problem: My turkey is dry.
- Fix: The brine is your best defense against a dry bird. Also, be sure not to overcook it—a reliable meat thermometer is essential. Finally, always let the turkey rest for at least 20 minutes before carving to allow the juices to settle back into the meat.
- Problem: The skin isn’t crispy.
- Fix: Make sure the turkey skin is patted completely dry with paper towels after rinsing. The initial high-heat blast at 500°F is designed to crisp the skin quickly. Ensure your oven is fully preheated before the turkey goes in.
- Problem: The turkey is browning too fast but isn’t cooked through.
- Fix: If the skin reaches a deep golden brown before the internal temperature is correct, simply tent the turkey loosely with a piece of aluminum foil to protect it from direct heat while it finishes cooking.
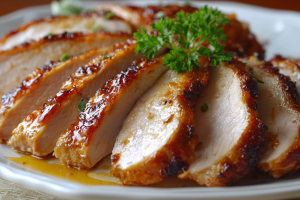
Carving and Serving Your Masterpiece
Once your turkey has rested, it’s time to present it. Carve it on a large cutting board with a well to catch any juices. Serve it proudly alongside your favorite side dishes. There is nothing quite like setting a beautiful, golden-brown turkey on the table for your loved ones. It’s a wonderful feeling, and you will have earned it. It pairs beautifully with the perfect creamy mashed potatoes to serve alongside.
This oven roasted turkey recipe is my gift to you. It’s more than food; it’s a way to show your love and create a moment of warmth and connection. From my kitchen to yours, I wish you a table full of joy, laughter, and a truly unforgettable meal. You can do this, and it will be wonderful.
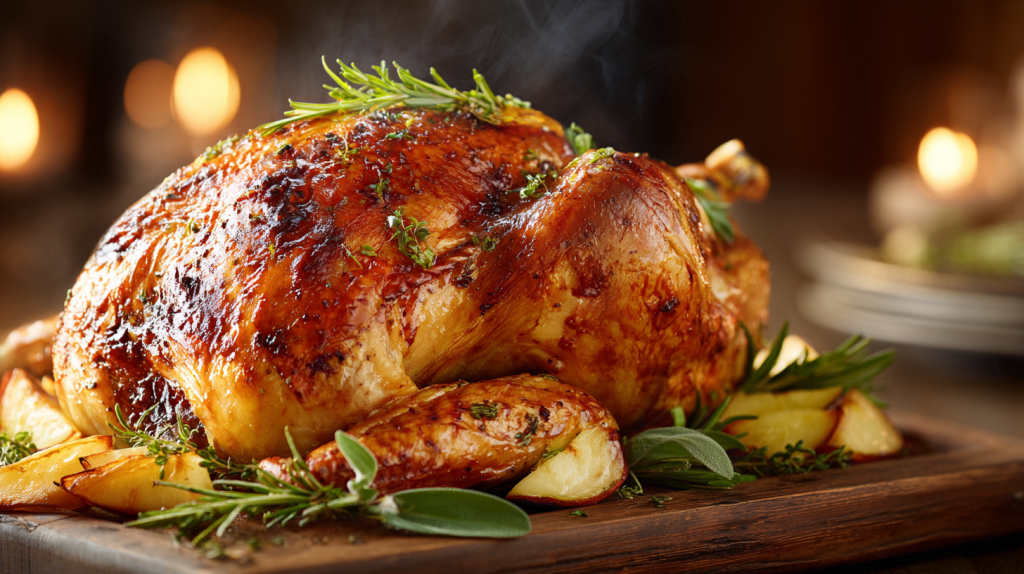
Ultimate Show-Stopping Roast Turkey
Equipment
- Large stockpot
- 5-gallon food-safe bucket or other large container for brining
- Roasting pan with a roasting rack
- Meat thermometer or probe thermometer
- Microwave-safe bowl
- Small bowl
Ingredients
- For the Brine:
- 1 14-16 pound frozen young turkey
- 1 gallon vegetable stock
- 1 cup kosher salt
- ½ cup light brown sugar
- 1 tablespoon black peppercorns
- 1½ teaspoons allspice berries
- 1½ teaspoons chopped candied ginger
- 1 gallon heavily iced water
- For the Turkey:
- 6 tablespoons butter softened and divided
- 2 apples 1 cored and halved, 1 sliced
- ½ onion sliced
- 1 cinnamon stick
- 4 sprigs fresh rosemary
- 6 leaves fresh sage
- 1 tablespoon garlic powder
- 2 tablespoons seasoning salt
- 2 tablespoons dried parsley
- 2 tablespoons dried minced onion
- Salt and pepper to taste
- ⅔ bottle 750ml Champagne or other dry sparkling wine
- Canola oil
Instructions
Two to Three Days Before Cooking:
- Begin thawing your turkey in the refrigerator. Ensure the temperature remains at 38°F or below. A large turkey can take up to 3 days to thaw safely.
The Day Before Cooking:
- Prepare the brine. In a large stockpot over medium-high heat, combine the vegetable stock, kosher salt, brown sugar, peppercorns, allspice berries, and candied ginger.
- Stir occasionally until the salt and sugar dissolve completely and the mixture comes to a boil.
- Remove from heat and let it cool to room temperature, then refrigerate until completely chilled.
The Night Before or Morning of Cooking:
- Combine the chilled brine with the iced water in a 5-gallon food-safe bucket or a container large enough to hold the turkey.
- Remove the turkey from its packaging. Remove the giblets and neck from the cavities (discard or save for making gravy).
- Rinse the turkey thoroughly, inside and out, with cold water.
- Place the turkey breast-side down in the brine. If it floats, weigh it down with a heavy plate to keep it fully submerged.
- Cover and refrigerate for 8-16 hours. For even brining, flip the bird halfway through the process.
Roasting Day:
- Remove the turkey from the brine. Discard the brine. Rinse the turkey thoroughly inside and out with cold water to remove excess salt.
- Pat the turkey completely dry with paper towels. This step is crucial for achieving crispy skin.
- Gently work your fingers between the breast meat and the skin to create pockets on both sides. Slide 3 tablespoons of softened butter under the skin on each side of the breast, spreading it as evenly as possible.
- Prepare the aromatics. In a microwave-safe bowl, combine the sliced apple, onion, cinnamon stick, and 1 cup of water. Microwave on high for 5 minutes to release their flavors.
- Stuff the turkey's main cavity with the halved apple and the steeped aromatics, along with the fresh rosemary and sage.
- Place the turkey breast-side up on a roasting rack set inside a large roasting pan. Tuck the wings underneath the body.
- Pour the Champagne over the entire bird, letting it run over the breast and into the cavity.
- Rub the entire surface of the skin with canola oil.
- In a small bowl, mix together the garlic powder, seasoning salt, parsley, and minced onion. Sprinkle this rub generously over the entire turkey. Finish with a few grinds of fresh black pepper.
Cooking the Turkey:
- High-Heat Start (Recommended Method): Preheat the oven to 500°F with the rack in the lowest position. Roast the turkey for 30 minutes to achieve a beautifully browned, crispy skin. Then, reduce the oven temperature to 350°F. Insert a probe thermometer into the thickest part of the breast (making sure it doesn't touch the bone) and continue roasting for an additional 2½ to 3½ hours.
- Traditional Roasting: Preheat the oven to 350°F and roast for 3½ to 4 hours total.
- The turkey is done when the breast meat reaches an internal temperature of 161°F (the temperature will rise to 165°F as it rests) and the thigh meat reaches 175-180°F.
- Remove the turkey from the oven and loosely tent it with foil. Let it rest for 20-30 minutes before carving. This allows the juices to redistribute, ensuring moist meat.
Notes
Carve the leftover turkey meat off the bone. Store it in an airtight container or a sealed plastic bag in the refrigerator for up to 4 days. For longer storage, you can freeze the cooked turkey for up to 3 months.
Nutrition
Rate This Recipe
Share This Recipe With The Ones You Love!