There is a particular kind of comfort that comes from walking into a house where something has been cooking low and slow all day long. The smell hits you before you even get through the door — rich, deep, the kind of warmth that wraps itself around you and tells you everything is going to be just fine. That is what a slow cooker does best. It takes tough, humble cuts of meat and plain dried beans and turns them into something that tastes like it took all the skill in the world, when really what it took was time and patience and knowing what to put in the pot before you walk away.
I will be honest with you — I was not quick to take to the slow cooker. I grew up cooking on the stove and in the oven, and my mother did too, and her mother before her. A pot of greens simmered on the back burner all afternoon. A roast went into the oven before church and came out when we got home. The idea of plugging in some electric pot and leaving it to do the work felt like cutting corners. But I will tell you this — once I started using one, I understood. It does not replace the stove or the oven. It does something different. It gives you back your time while it does the slow, patient work of turning something tough into something tender.
This is not about dumping a can of soup over a chicken breast and calling it dinner. That is not cooking — that is assembly. What I want to teach you is how to use a slow cooker the way a good Southern cook uses a Dutch oven on the stovetop — building flavor from the bottom up, choosing the right cuts, knowing when to add things and when to leave them alone. The slow cooker is a tool, and like any tool, it is only as good as the hands that use it.
Why the Slow Cooker Belongs in a Southern Kitchen
Southern cooking has always been about making the most of what you have. That means tough cuts of meat, dried beans, root vegetables, and greens that need long cooking to break down and get tender. Every one of those things is exactly what a slow cooker was made for. The low, steady heat does the same work that a cast iron Dutch oven on a back burner does — it just does it without you having to stand there and watch the flame.
I still use my Cast Iron Cooking: The Southern Way for plenty of things, and there are meals that belong on the stovetop and nowhere else. But on a day when I have got errands to run or grandchildren coming for supper and I need my hands free, the slow cooker earns its place on my counter. It is not a shortcut. It is a different path to the same destination — food that has had time to develop deep, honest flavor.
The secret that most people miss is this: a slow cooker does not build flavor on its own. You have to put the flavor in there. That means browning your meat first. That means sautéing your onions. That means seasoning properly before the lid goes on. The slow cooker is the finishing tool, not the starting point. If you skip the work at the beginning, you will taste the difference at the end.
Choosing the Right Slow Cooker
You do not need anything fancy. I have used the same basic oval slow cooker for more years than I care to count, and it has done everything I have ever asked it to do. That said, there are a few things worth paying attention to when you are choosing one.
Size matters more than features. A six-quart oval cooker is the workhorse size for a Southern kitchen. It is big enough to hold a pot roast with vegetables, a full batch of beans, or a pile of greens. If you are cooking for just one or two people, a four-quart will do, but I always say go bigger — you can cook a small meal in a big cooker, but you cannot fit a big meal in a small one. The oval shape is better than round because it fits a whole chicken or a long roast without you having to cut it down.
The features I care about are simple: low, high, and warm settings. That is all you need. Some of the newer ones have timers that switch to warm automatically, and I will admit that is nice when you are gone all day. But programmable settings and fancy digital displays do not make the food taste any better. The ceramic insert is what does the cooking, and they all work about the same.
One thing I will say — if you can find one with a heavy, tight-fitting lid, that is worth looking for. The lid keeps the moisture in, and every time you lift it, you lose heat and add cooking time. A good lid seals well and lets you see through it so you are not tempted to peek.
The One Step You Must Not Skip: Browning First
This is the single biggest difference between a slow cooker meal that tastes like something and one that tastes like nothing. If you take a raw piece of meat and put it straight into the slow cooker with some liquid and walk away, what you will get is something that is technically tender but has no depth. It will taste flat. It will look gray. It will be the kind of meal nobody asks for seconds of.
But if you take that same piece of meat, season it well, and sear it in a hot Dutch Oven Cooking on the Stovetop: A Complete Guide or cast iron skillet until it has a deep brown crust on every side — now you have something. That browning is where the flavor lives. All those dark, caramelized bits on the surface of the meat carry into the slow cooker and build the foundation of everything that comes after.
I know it sounds like extra work. It is extra work — about ten minutes of it. And it is worth every second. After you brown the meat, use a splash of broth or wine to scrape up the bits stuck to the bottom of the pan. That is called deglazing, and those browned bits are pure concentrated flavor. Pour all of that right into the slow cooker along with the meat. You can read more about why this matters in How to Deglaze a Pan and Why You Must.
The same goes for onions. Raw onions thrown into a slow cooker will cook down, but they will not taste like onions that have been softened in a little butter or bacon grease until they are golden and sweet. That five minutes of sautéing makes all the difference in the world.
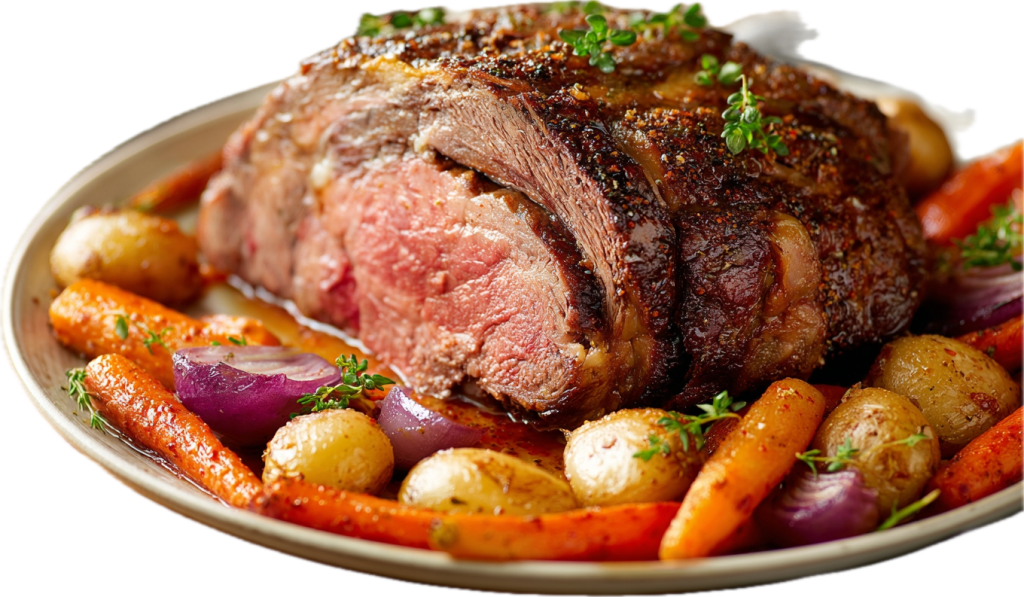
Southern Pot Roast: The Slow Cooker’s Best Work
If there is one thing a slow cooker was born to do, it is a pot roast. A good chuck roast — three to four pounds, well marbled with fat running through it — is the perfect candidate. It is a tough cut that needs long, slow cooking to break down, and that is exactly what the slow cooker gives it.
I season my roast generously with salt and black pepper the night before and let it sit uncovered in the refrigerator. That does two things — it lets the salt work its way into the meat, and it dries the surface so you get a better sear. The next morning, I heat my cast iron skillet until it is smoking hot and sear that roast on every side until it is dark brown and crusty. Do not rush this. Give each side a good three to four minutes without moving it.
While the meat is searing, I slice onions thick — about half an inch — and lay them in the bottom of the slow cooker. They act as a rack, keeping the roast off the bottom and adding sweetness to the liquid as they cook down. The seared roast goes right on top of the onions. Then I deglaze the skillet with beef broth, scrape up every bit of fond, and pour it over the roast. I add enough broth to come about a third of the way up the sides of the meat — no more. You are braising, not boiling.
Carrots and potatoes go in during the last two to three hours. If you put them in at the beginning, they will be mush by the time the meat is done. Cut them into big chunks — nothing smaller than two inches. They hold up better that way and give you something to bite into. Eight hours on low, and that roast will be falling apart when you look at it. The liquid in the bottom of the pot is rich and dark and makes the best gravy you have ever tasted if you thicken it up on the stove. That is a skill worth learning from How to Make Perfect Gravy: Every Type.
Slow Cooker Greens: Collards, Turnip, and Mustard
Greens are one of the things the slow cooker does surprisingly well, and I say surprisingly because I spent most of my life cooking them on the stovetop in a big pot with a ham hock. But the slow cooker gives you that same long, slow simmer without you having to keep an eye on the pot all afternoon.
The key is the same no matter what method you use — you need seasoning meat. A smoked ham hock, a piece of The Flavor Bombs: How to Use Fatback, Neck Bones & Ham Hocks, or a few thick slices of bacon give the greens the smoky, salty backbone they need. I put my seasoning meat in the slow cooker first with enough chicken broth or water to cover the bottom by about two inches. Then I add a splash of apple cider vinegar — that little bit of acid brightens everything up and keeps the greens from tasting flat.
Now, I am particular about how I clean my greens. Each leaf gets washed individually, and I mean individually. Fill your sink with cold water, swish them around, lift them out, drain the water, and do it again until there is not a speck of grit at the bottom of the sink. There is nothing worse than biting down on sandy collards. You can read more about the right way to do it in My Greens are Gritty! How to Clean Collards and Mustard Greens Properly.
Strip the leaves from the stems — the stems are tough and fibrous and do not belong in your pot unless you are cooking turnip greens, which have a more tender stem. Stack the leaves, roll them up tight like a cigar, and cut them into strips about an inch wide. Pack them into the slow cooker on top of the seasoning meat. They will look like way too much, but they cook down to almost nothing. Six hours on low and they will be silky, tender, and full of flavor. The pot likker at the bottom is worth saving — read about what to do with it in What is Pot Likker? And How to Use It.
Beans and Peas: Where the Slow Cooker Shines Brightest
If I had to pick just one thing to cook in a slow cooker for the rest of my life, it would be beans. Dried beans and the slow cooker were made for each other. Pintos, great northerns, lima beans, butter beans, black-eyed peas, crowder peas — every one of them comes out better in a slow cooker than in any other method I have tried, and I have tried them all.
Here is my method, and I do not stray from it. The night before, I sort through my beans and pick out any rocks or shriveled ones — and there are always a few, do not skip this step. Then I soak them overnight in plenty of cold water. Some people will tell you that you do not have to soak, and that is technically true, but soaking cuts your cooking time and gives you more evenly cooked beans. Drain and rinse them the next morning.
Into the slow cooker goes a ham hock or a piece of salt pork — that is your flavor base. Then the soaked beans. Then a diced onion, a few cloves of garlic smashed with the flat of your knife, and a bay leaf or two. Cover everything with fresh water or broth by about two inches. Do not add salt yet — salt toughens the skins of beans if you add it too early. That is a lesson I learned the hard way more than once before it stuck.
Eight hours on low, and those beans will be creamy and tender and sitting in a thick, rich pot liquor that is a meal in itself ladled over cornbread. I add my salt in the last hour of cooking, taste, and adjust. A little splash of vinegar at the very end — just a teaspoon or two — does wonders for pulling everything together. For more on getting your beans right, A Guide to Southern Beans & Peas covers the different varieties and what makes each one special.
Smothered Chicken in the Slow Cooker
Smothering is one of the great techniques of Southern cooking, and while I usually do it on the stovetop in a cast iron skillet with a heavy lid, the slow cooker does a beautiful job of it too — especially on days when you cannot babysit a pan for an hour. If you want the traditional stovetop method, How to Make Traditional Smothered Chicken is where you want to go. But for the slow cooker version, here is how I do it.
Start with bone-in, skin-on chicken thighs. Do not use boneless, skinless breasts for this — they dry out over a long cook, and they do not have the flavor or the fat that thighs do. Season the thighs well with salt, pepper, garlic powder, and a little paprika. Brown them skin side down in a hot skillet with a tablespoon of oil or bacon grease. You want that skin golden and crispy. It will not stay crispy in the slow cooker, but the browning adds flavor that you cannot get any other way.
While those thighs are browning, slice two large onions into half-rings. After you pull the chicken out, drop those onions into the same skillet with the rendered chicken fat and cook them until they are soft and just starting to turn golden — about five minutes. Sprinkle a couple tablespoons of flour over the onions and stir it in. That is your Roux: The Foundation of Southern Cooking building right there in the pan. Add a cup and a half of chicken broth slowly, stirring as you go, and let it thicken into a gravy.
Pour half the onion gravy into the slow cooker, lay the browned chicken thighs on top, and pour the rest of the gravy over everything. Six hours on low. When it is done, the chicken will be falling off the bone and the gravy will be rich and silky and full of sweet, melted-down onions. Serve it over rice or with biscuits to soak up every bit of that gravy.
What the Slow Cooker Does Not Do Well
I believe in being honest about the limits of any tool, and the slow cooker has its share. Not everything belongs in there, and knowing what to keep out is just as important as knowing what to put in.
Anything that is supposed to be crispy does not belong in a slow cooker. Fried chicken, fried okra, anything breaded — the moisture trapped under that lid will turn a crispy crust into a soggy mess every time. If you want crispy, you want a cast iron skillet and hot oil, and you can find everything you need in A Masterclass in Southern Cooking Techniques: Frying, Braising & Smothering.
Delicate vegetables do not hold up either. Fresh green beans, squash, zucchini, and peas will turn to mush if they cook all day. If you want to add them, put them in during the last thirty to forty-five minutes. Root vegetables — carrots, potatoes, turnips — can handle more time, but even they should not go in at the very beginning if your cook time is eight hours or more.
Dairy is another thing to be careful with. Milk, cream, and sour cream will curdle if they cook too long. If your recipe calls for cream or cheese, stir it in during the last fifteen to twenty minutes, just long enough to warm through and meld with everything else. The same goes for fresh herbs — they lose their brightness over a long cook. Add dried herbs at the beginning for backbone flavor, and stir in fresh herbs right at the end for that burst of color and freshness.
And pasta — do not cook pasta in a slow cooker from the start. It will blow up into a starchy, gummy mess. If you must add it, use it in the last twenty to thirty minutes and keep an eye on it.
The Temperature Question: Low vs. High
People ask me all the time whether they should cook on low or high, and the answer depends on what you are cooking and how much time you have. But here is the thing most people do not realize — both settings eventually reach the same temperature, right around 209 degrees. The difference is how long it takes to get there. Low takes longer to come up to temperature, which means the food spends more time in that gentle, slow cooking zone. High gets there faster.
For tough cuts of meat — chuck roasts, pork shoulders, neck bones, oxtails — low is almost always better. The slower the collagen breaks down, the more tender and silky the result. Rushing it on high can leave you with meat that is technically done but still has a toughness to it that low-and-slow would have dissolved. If you are cooking How to Cook Neck Bones Until They Fall Off the Bone or How to Cook Oxtails Low and Slow on the Stove, you already understand the value of patience — and the slow cooker on low is that same patience, just in a different vessel.
High is fine for things like beans and soups where you want to get the liquid up to a simmer faster, or when you are short on time and need to cut an eight-hour cook down to four or five. But if you have the time, low is almost always the answer. There is a reason our grandmothers let things simmer on the back burner all day long. Time is an ingredient, and it is one you cannot rush.
Building Flavor in Layers
The biggest mistake people make with a slow cooker is treating it like a dump-and-go situation. They put everything in raw, turn it on, and wonder why the result tastes bland and one-dimensional. Southern cooking has never been about just putting food in a pot and hoping for the best. It has always been about The Philosophy of Layering Flavor at Every Step, and the slow cooker is no exception.
Here is how I think about it. Every layer you build before the lid goes on is flavor you will taste when the lid comes off. Layer one is your seasoning meat — a ham hock, bacon, salt pork, or neck bones going into the pot first to lay the foundation. Layer two is your aromatics — onions, celery, garlic, bell pepper, cooked until they are soft and sweet. That is your The Southern Holy Trinity: Onions, Celery, and Bell Pepper doing its work. Layer three is your main protein or vegetable, browned and seasoned. Layer four is your liquid — broth, stock, pot likker, tomatoes, whatever the dish calls for. And layer five is the time — the hours of gentle heat that marry everything together into something greater than the sum of its parts.
Skip any one of those layers and you will feel its absence in the finished dish. It will not be bad, necessarily. But it will not be what it could have been. And when you are feeding the people you love, what it could have been is always the standard I am cooking to.
My Rules for the Slow Cooker
After years of using one, I have settled on a set of rules I do not break. They are simple, and they work every single time.
Fill the slow cooker between half and two-thirds full. Less than half and things cook too fast and can scorch on the edges. More than two-thirds and it will not cook evenly, and you risk the liquid bubbling up under the lid and making a mess on your counter.
Put root vegetables on the bottom, closest to the heat source. They take longer to cook than meat, which surprises most people. Carrots and potatoes go in first, then the meat goes on top. This is the opposite of what feels natural, but it works.
Do not use too much liquid. The slow cooker traps moisture — whatever liquid is in your ingredients plus whatever you add stays right there under that lid. If you use as much liquid as you would in a stovetop braise, you will end up with a watery, diluted result. Start with less than you think you need. You can always add more, but you cannot take it out.
Season twice — once before cooking and once after. The long cook can mute flavors, especially salt. I always taste and adjust in the last hour. A pinch of salt, a crack of pepper, maybe a splash of vinegar or hot sauce to wake everything up. That final seasoning is what takes a good slow cooker dish and makes it taste like it was fussed over all day.
Adapting Stovetop Recipes for the Slow Cooker
Almost any Southern recipe that cooks low and slow on the stovetop can be adapted for the slow cooker, but you need to make a few adjustments. It is not a straight one-to-one translation.
First, reduce your liquid by about a third. Like I said, the slow cooker does not lose moisture the way an open pot on the stove does. Whatever goes in stays in. If your stovetop recipe calls for three cups of broth, start with two in the slow cooker.
Second, adjust your timing. Generally speaking, one hour of simmering on the stovetop equals about four hours on low or two hours on high in a slow cooker. A pot roast that takes three hours in a Dutch oven in the oven at 300 degrees will take about eight hours on low in the slow cooker. These are not exact conversions — every slow cooker runs a little differently — but they are close enough to get you started.
Third, hold back your delicate ingredients. Anything that would go in during the last twenty minutes on the stove — fresh herbs, cream, cheese, quick-cooking vegetables, pasta — goes in during the last thirty minutes to an hour in the slow cooker. The longer cook time is more forgiving in some ways but less forgiving in others, and overcooking delicate things is where most people go wrong.
And fourth, always brown your meat and sauté your aromatics on the stove first, even if the original recipe does it all in one pot. The slow cooker cannot sear. It cannot caramelize. It cannot do what high, direct heat does. You need to bring that flavor to the party yourself before the slow cooking begins. This is where understanding Low & Slow on the Stovetop: Mastering Patience for Meat and Vegetables helps you translate that same philosophy into the slow cooker.
Keeping It Safe: A Word on Food Safety
I do not spend a lot of time worrying in the kitchen, but food safety is one thing I do not take lightly, especially with a slow cooker. The danger zone — that range between 40 and 140 degrees where bacteria grow fastest — is something you need to be aware of because the slow cooker takes time to come up to temperature.
Here are the things I always do. I never put frozen meat in the slow cooker. Always thaw it completely in the refrigerator first. Frozen meat takes too long to come up to a safe temperature, and you are asking for trouble. If you need to thaw quickly, How to Thaw Meat Safely and Quickly will walk you through your options.
I do not leave cooked food sitting in the slow cooker on the warm setting for more than two hours after it finishes cooking. Once the meal is done, we eat, and the leftovers go into containers and into the refrigerator within an hour or two. That is just good practice.
And I never reheat food in the slow cooker. It takes too long to come back up to temperature. If you have leftovers, reheat them on the stove or in the oven where you can get them hot quickly. For the best ways to bring Southern food back to life, How to Reheat Southern Classics: Fried Chicken, Biscuits, Mac & Cheese has you covered.
The Meals That Got Me Through
I want to close by telling you something true. The slow cooker got me through some of the busiest seasons of my life. When the children were small and the days were long and there were ball games and church suppers and homework and everything else that comes with raising a family, the slow cooker meant that no matter how the day went, supper was ready when we walked through the door. It was not fancy. It was a pot roast. It was beans and cornbread. It was chicken smothered in onion gravy. But it was hot, it was good, and it meant we all sat down together at the table.
That is what cooking has always been about for me — not impressing anyone, not making something that looks like it belongs in a magazine, but putting real food on the table for the people I love. The slow cooker is just one more way to do that, and it does it well. You learn to trust it the way you learn to trust a good cast iron skillet or a hot oven — by using it, by paying attention, and by making it your own.
If you are just starting out in the kitchen or if you are looking for ways to make weeknight suppers easier without giving up the flavors you grew up with, the slow cooker is a fine place to begin. Build your flavor first, choose the right cuts, respect the time, and leave the lid alone. The rest will take care of itself. And if you want to see how this fits into the bigger picture of Southern cooking, The Complete Guide to Southern Cooking: Techniques, Traditions & Time-Tested Wisdom ties it all together.