This Cathead Biscuits recipe is the secret to the tallest, fluffiest mounds of golden dough you’ll ever pull from a skillet!
Whether you are a seasoned baker or attempting your first batch, this method guarantees those crispy edges and pillowy centers that define true southern cooking. This dish is perfect alongside Meatloaf and a scoop of Creamy Mashed Potatoes.

I have seen individuals struggle with biscuits that came out looking more like hockey pucks than the fluffy clouds they remembered from childhood Sundays. There is nothing more disheartening than pulling a tray from the oven only to find flat, dense dough that refuses to rise. It makes you feel like you’re missing some secret gene that only grandmothers possess.
I once worked in a restaurant where the most desired position was biscuit maker. Everyone wanted to make the biscuits because this is what that restaurant was known for. In the morning, we served bacon and egg biscuits with some of the finest cheeses. In the evening, we served biscuits with the most delicious milk gravy. We did not make cathead biscuits at this restaurant, but I am still going to share some of the secrets I learned with you today!
I am here to tell you that the “secrets” are not magic, and it isn’t difficult to bake a delicious fluffy biscuit!
My promise to you is simple: if you follow this guide, you will bake the best biscuits of your life. We are going to strip away the intimidation and focus on the feel of the dough. This isn’t just a recipe; it is a masterclass in texture and temperature. By the time we are done, you will understand exactly how to manipulate flour and fat to create those giant, craggy tops that give these biscuits their famous name.
Here’s How To master This Delicious Cathead Biscuits Recipe
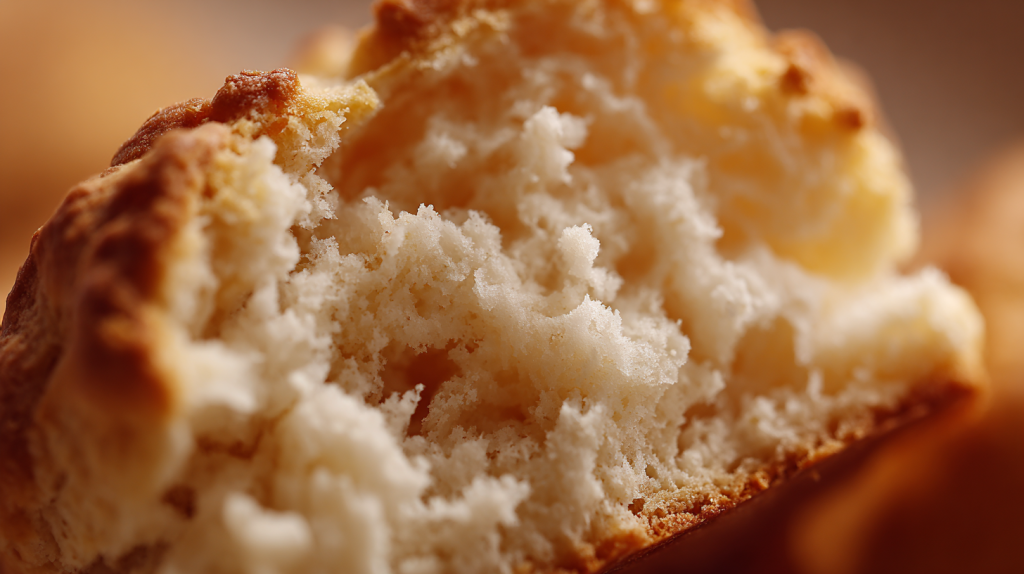
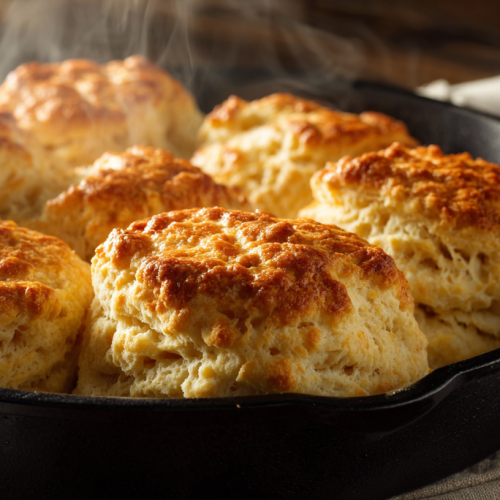
If you have ever wondered why they call them “Cathead Biscuits,” the answer is as practical as the cooks who named them: they are simply as big as a cat’s head. Unlike their dainty, rolled-out cousins often served at tea parties, these are working biscuits. They are rustic, drop-style giants designed to fill you up and sustain you through a long day. But beyond the charming name lies a bit of kitchen science that makes this specific method superior to others.
The soul of this dish lies in its “drop” technique. Most biscuit recipes require you to roll out the dough and cut it with a biscuit cutter. While that makes for a pretty, uniform circle, it also introduces a risk: overworking the dough. Every time you roll and re-roll scraps, you develop gluten, which creates toughness. With this cathead biscuits method, we bypass that risk entirely. We gently scoop mounds of dough and drop them right into the skillet. This preserves the delicate air pockets we worked so hard to create, ensuring the final product is tender enough to melt in your mouth.
Furthermore, we bake these in a cast iron skillet at a high temperature—450°F. This is non-negotiable. The cast iron holds intense heat, searing the bottom of the biscuit to create a crunchy, buttery crust that stands up to gravy or molasses. The high oven heat causes the cold butter and buttermilk to release steam rapidly, forcing the dough upward before the structure sets. It is this combination of a gentle hand and fierce heat that creates that signature “impossibly tall” rise.
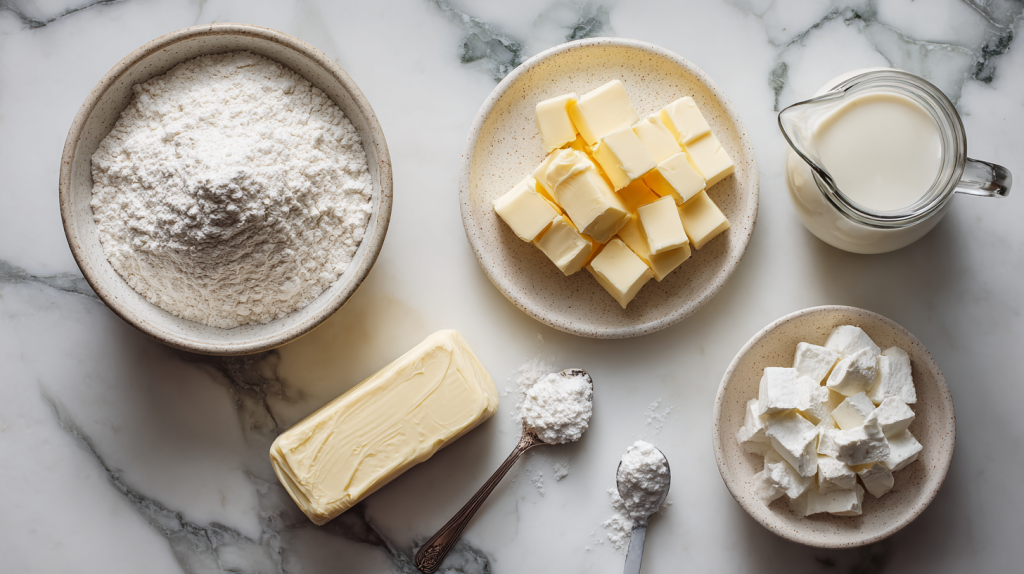
The Key Ingredients: Secrets to Flavor
To achieve true Southern perfection, you cannot simply grab whatever is in the pantry. The ingredients must be chosen with intention. This recipe relies on a specific interplay of fats and flours to achieve that balance of flavor and structure.
The Flour: While the recipe calls for all-purpose flour, I always suggest looking for a soft wheat flour if you can find it. Brands like White Lily are famous in southern cooking because they have a lower protein content, which means less gluten development and a tenderer crumb. However, standard all-purpose flour works beautifully here too, provided you sift it. Sifting aerates the flour, preventing dense clumps and ensuring your measurements are accurate.
The Fats (Butter and Shortening): This recipe uses a “split decision” on fats—a mix of unsalted butter and vegetable shortening (or lard). This is a professional tip passed down through generations. Butter provides that undeniable, rich flavor and golden color. Shortening, however, has a higher melting point and 100% fat content (unlike butter, which has water). This helps the biscuit hold its structural integrity and rise higher without spreading out flat. Using both gives you the best of both worlds: flavor and height.
The Liquid (Buttermilk): You absolutely need full-fat buttermilk. The acid in buttermilk reacts with the baking soda to create carbon dioxide bubbles—this is your lift. But beyond the chemistry, the tang of buttermilk cuts through the richness of the fats, providing a complex flavor profile that regular milk simply cannot match. If you are in a pinch, you can make a substitute with milk and vinegar, but for the authentic experience, buy the real jug.
Pro-Tip: Keep your ingredients cold. I mean icy cold. I usually cut my butter into cubes and put it back in the fridge until the very second I need it. If the fat melts before it hits the oven, you lose your layers.
How to Make Cathead Biscuits: My Step-by-Step Method
This is where we leave the recipe card behind and talk about what your hands should feel. Making biscuits is a tactile experience. You have to listen to the dough.
Preparing the “Shaggy” Base
First, preheat your oven to 450°F and place your rack in the center. While it heats, butter your skillet generously. Do not skimp here; that butter fries the bottom of the biscuit.
When you mix your dry ingredients, ensure they are thoroughly blended. You don’t want a pocket of bitter baking soda in one bite. Now, when you cut in your cold butter and shortening, you are looking for a specific texture. You want it to look like coarse meal, but you must leave some chunks of butter the size of peas. Those larger chunks are little flavor bombs that will melt and create steam pockets later.
The Gentle Fold
This is the moment that makes or breaks your cathead biscuits. Pour in your cold buttermilk. Using a fork, gently fold the flour into the liquid. Do not whip it. Do not beat it. You want to stop mixing the second—and I mean the second—the dough comes together. It should look “shaggy,” meaning it’s rough, sticky, and messy. It might even look a little unmixed in spots. That is perfect. If you mix until it’s smooth like cake batter, you have already lost the battle against toughness.
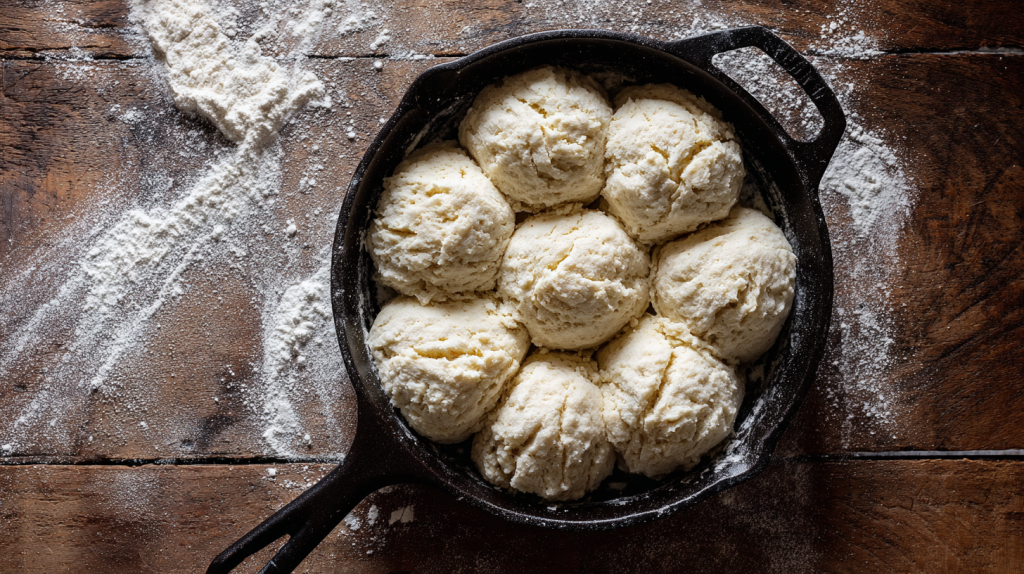
The Drop and Bake
Dust your hands with flour—you’ll need it. Reach in and grab a handful of dough about the size of a tennis ball. Treat it like a fragile egg. Do not squeeze it. Just gently shape it into a rough mound and drop it into the skillet. Repeat this for all 8 biscuits.
Here is a critical nuance: arrange them so they are just touching each other. This is called “shouldering.” When the biscuits touch, they support each other as they rise. Instead of spreading outward and getting flat, they have nowhere to go but up.
Brush the tops with melted butter and get them into that hot oven immediately. Bake for 18 to 22 minutes. You aren’t just looking for brown; you want a deep, mahogany gold on top.
Insider Secret: Do not open the oven door for the first 15 minutes. The steam generating inside the biscuits is doing heavy lifting. If you open the door, you let the heat escape and the biscuits might collapse. Trust the process.
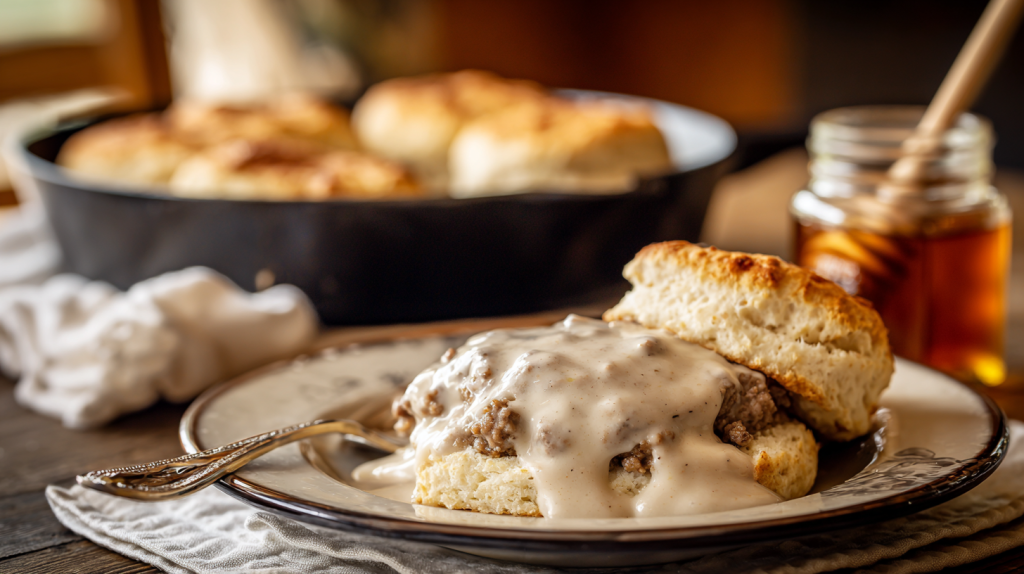
Serving Suggestions & Perfect Pairings
There is a holiness to a fresh biscuit served straight from the skillet, perhaps just with a pat of good salted butter. However, these sturdy giants are capable of supporting hearty toppings. Because of their size and slight savory note from the buttermilk, they are the ideal vehicle for heavy, rich sauces.
For a classic southern breakfast, these are mandatory with Sawmill Gravy or a spicy Sausage Gravy. The crisp exterior of the biscuit holds up against the liquid, softening just enough to be spoon-able without turning into mush. If you prefer a sweet contrast, try them with sorghum molasses or apple butter. The deep, earthy sweetness of molasses pairs beautifully with the tang of the buttermilk dough.
I love serving this alongside Garlic Green Beans for a supper side, or with a hearty stew. They are substantial enough to act as the “bread bowl” for chili or beef stew. For a Sunday brunch, set up a “biscuit bar” with various jams, honey, ham slices, and pimento cheese, letting your guests build their own masterpiece.
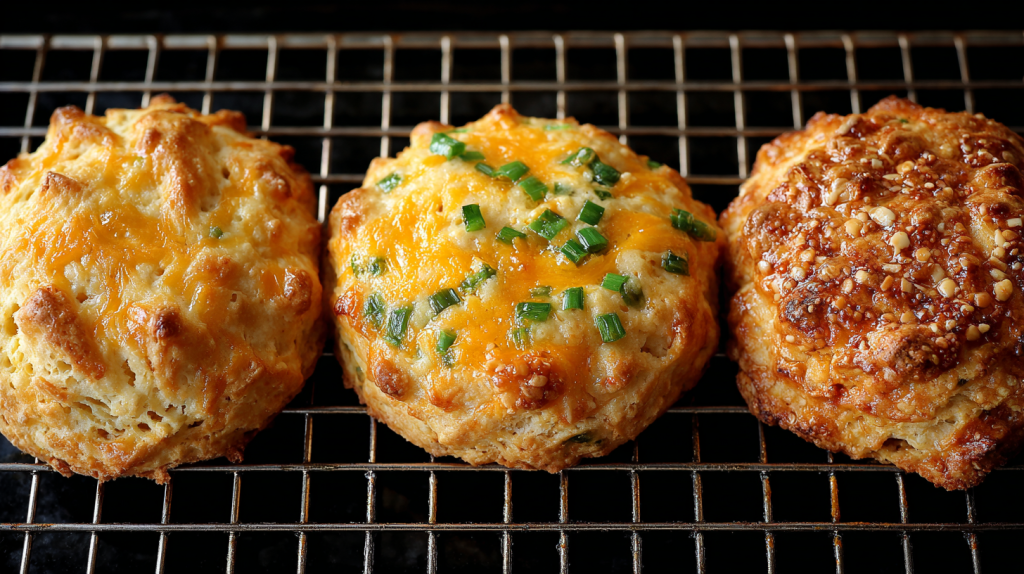
Delicious Variations to Try
Once you have mastered the master recipe, the kitchen is your playground. The neutral, buttery base of these biscuits takes well to all sorts of mix-ins.
The Cheddar-Chive Lift: For a savory twist, fold in 1 cup of sharp shredded cheddar cheese and ¼ cup of fresh chopped chives into the dry flour mixture before adding the buttermilk. The cheese creates these crispy, frico-like edges where it touches the pan. My family loves this version alongside a bowl of tomato soup—it’s like a grown-up grilled cheese dipper.
The Sweet Glazed Morning: If you have a sweet tooth, increase the sugar in the dough to 4 tablespoons. Before baking, brush with heavy cream instead of butter and sprinkle with turbinado sugar. When they come out, drizzle with a simple vanilla glaze. It’s almost like a scone, but fluffier. This is a wonderful surprise for holiday mornings when you want something special but don’t want to fuss with yeast rolls.
The Black Pepper & Bacon: Cook 4 slices of bacon until crisp, crumble them, and add them to the flour. Add a teaspoon of coarse cracked black pepper. This variation is punchy and bold. The bacon fat renders a little into the biscuit as it bakes, making the interior incredibly moist. It is a meal all on its own.
Storage, Reheating & Make-Ahead Tips
I will be honest with you: a biscuit is at its absolute peak 10 minutes out of the oven. However, life doesn’t always allow for fresh baking every morning. The good news is that because of the high fat content in this recipe, these Cathead Biscuits stay moist longer than leaner breads.
Storage: Store leftover biscuits in an airtight container at room temperature for up to 2 days. Do not put them in the refrigerator! The fridge accelerates the staling process of bread, making them dry and crumbly. If you need to keep them longer than 2 days, freeze them. Wrap each biscuit individually in plastic wrap and then place them all in a heavy-duty freezer bag. They will keep for 3 months.
Reheating: To revive a day-old biscuit, preheat your oven or toaster oven to 350°F. Place the biscuits on a sheet pan and cover them loosely with foil (this prevents the tops from burning while the inside warms). Heat for 8-10 minutes. This wakes up the butter and crisps the crust back up.
Pro-Tip: If you are reheating a frozen biscuit, do not thaw it first. Just bake it at 350°F for about 15-20 minutes covered with foil.
Make-Ahead: You can mix the dry ingredients and cut in the fat the night before. Store this sandy mixture in a sealed container in the fridge. In the morning, all you have to do is stir in the buttermilk and bake. This saves you the messy step of cutting in butter when you are half-awake!
Leftover Magic: Creative Ways to Use Cathead Biscuits
If you find yourself with leftovers that have gone a bit stale, do not throw them to the birds! Stale biscuits are an ingredient in their own right.
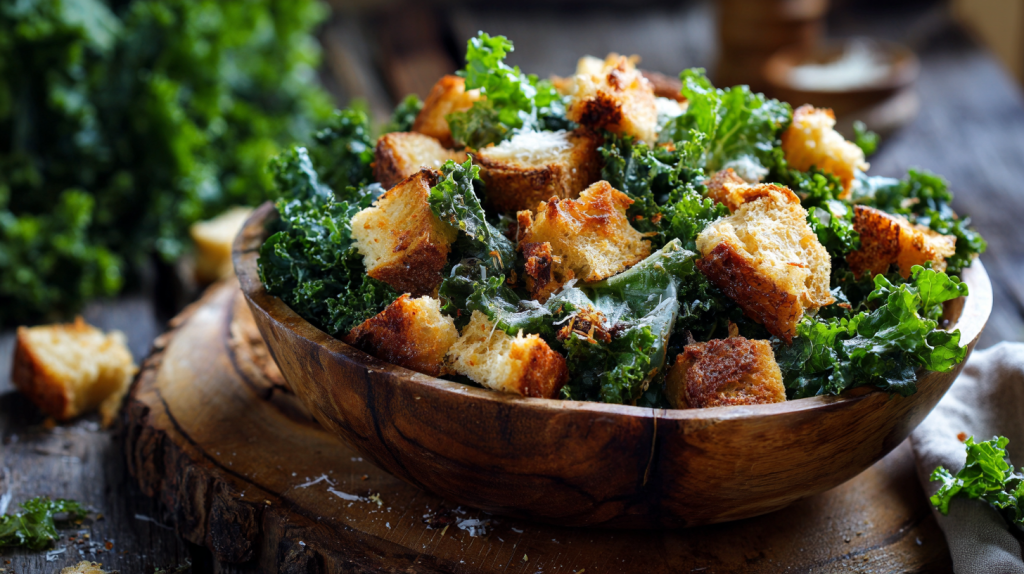
Biscuit Croutons: Cube the leftover biscuits, toss them with a little melted butter and garlic powder, and toast them in the oven until crunchy. These are spectacular on a kale salad or tomato soup. The texture is much more interesting than store-bought croutons because the inside stays slightly yielding while the outside shatters.
Southern Bread Pudding: Treat the biscuits like brioche. Tear them into chunks and soak them in a custard of eggs, milk, sugar, and vanilla. Bake until puffed and golden. The slight saltiness of the biscuit plays against the sweet custard in a way that is dangerously addictive. I like to add a handful of pecans and raisins to mine.
Troubleshooting: Your Questions Answered
Even with the best instructions, baking can be temperamental. Here are the most common questions I get about Cathead Biscuits and how to fix them.
Why are my biscuits flat and spreading?
This usually means your fats got too warm. Remember, we need those cold chunks of butter to stay solid until they hit the oven heat. If you handle the dough too much with warm hands, the butter melts prematurely. Next time, try chilling your bowl and flour before you start, and handle the dough as little as possible.
Why is the inside of my biscuit doughy or raw?
Because these are “cathead” sized (giant), they take longer to cook through than small biscuits. If your tops are browning but the centers are raw, your oven might be running hot. Tent the skillet loosely with aluminum foil for the last 5-8 minutes of baking. This protects the crust while allowing the heat to penetrate to the center.
Can I substitute the buttermilk?
Technically, yes, but you will lose flavor and rise. Bon Appétit has a great article explaining why real buttermilk is superior for texture. If you absolutely must, mix 1 cup of whole milk with 1 tablespoon of lemon juice or white vinegar and let it sit for 5 minutes. It works in a pinch, but the real stuff is always better.
Why are my biscuits tough?
You overmixed the dough. It is the most common mistake! When you add the wet ingredients to the dry, stop mixing when you still see flour streaks. It feels wrong, I know, but that shaggy, messy dough is the key to tenderness. If the dough looks smooth, you have developed too much gluten.
Can I use a baking sheet instead of a cast iron skillet?
You can, but you won’t get that signature dark, crispy bottom crust. If you use a baking sheet, arrange the biscuits so they are touching (shouldering) to help them rise, and consider using a silicone baking mat or parchment paper to prevent sticking. You may need to reduce the baking time by a minute or two as metal pans heat up faster than heavy cast iron.
There is a profound satisfaction in pulling a skillet of Cathead Biscuits from the oven. The smell of toasted butter fills the house, bringing a sense of comfort that few other foods can match. I hope this guide gives you the confidence to get your hands floury and trust your instincts. Remember, the perfect biscuit isn’t about precise geometry; it’s about the warmth and love you pour into the process. I can’t wait to hear how this turns out in your kitchen!
Old-Fashioned Southern Cathead Biscuits – Fluffy, Buttery & Impossibly Tall
Equipment
- 12-inch cast iron skillet
- Large mixing bowl
- Pastry cutter or two forks
- Pastry brush
- Wire cooling rack
Ingredients
Dry Ingredients
- 3 cups all-purpose flour sifted, plus extra for dusting
- 1 tablespoon baking powder
- 1/2 teaspoon baking soda
- 1 1/2 teaspoons fine sea salt
- 2 tablespoons granulated sugar
Fats
- 6 tablespoons unsalted butter cold, cut into small cubes
- 1/4 cup vegetable shortening or lard cold
Wet Ingredients
- 1 1/2 cups buttermilk cold, plus more if needed
For Finishing
- 3 tablespoons butter melted, for brushing
Instructions
- Position your oven rack in the center and heat your oven to 450°F. Take your cast iron skillet and generously coat the bottom and sides with about a tablespoon of butter or shortening. Set this aside while you prepare the dough.
- Sift your flour into a large mixing bowl to ensure a light texture. Add the baking powder, baking soda, salt, and sugar directly to the flour. Use a whisk to thoroughly blend these dry ingredients together – this step is crucial for even leavening and tall, uniform biscuits.
- Scatter the cold butter cubes and shortening over the flour mixture. Using a pastry cutter, two forks, or your fingertips, work the fats into the flour until the mixture resembles coarse meal with pea-sized lumps of fat still visible throughout. These fat pockets create steam during baking, which gives you those beautiful flaky layers.
- Create a well in the center of your flour mixture and pour in the cold buttermilk. Using a fork, gently stir from the outside in, folding the flour into the liquid. Stop mixing as soon as a shaggy, sticky dough forms – the dough should look rough and slightly wet. If dry spots remain, drizzle in additional buttermilk one tablespoon at a time.
- Dust your hands generously with flour. Reach into the bowl and pull off a large portion of dough, roughly the size of a tennis ball. Without kneading or compressing, gently shape it into a thick, rustic mound and place it directly in your prepared skillet. Repeat with the remaining dough to form 8 biscuits, arranging them so they just barely touch – this contact helps them rise upward rather than outward.
- Brush the tops of your unbaked biscuits with about half of the melted butter. Transfer the skillet to your preheated oven immediately – working quickly keeps everything cold, which is essential for maximum rise.
- Bake for 18 to 22 minutes, rotating the skillet halfway through if your oven heats unevenly. The biscuits are done when their tops turn a deep golden brown and they have risen dramatically – at least doubling in height. The edges should appear set while the centers may still look slightly soft.
- Remove the skillet from the oven and immediately brush the hot biscuit tops with the remaining melted butter. Allow them to rest in the skillet for 3 to 5 minutes before using a spatula to gently separate and transfer them to a wire rack or serving basket. Serve warm for the ultimate experience.
Nutrition
Rate This Recipe
Share This Recipe With The Ones You Love!