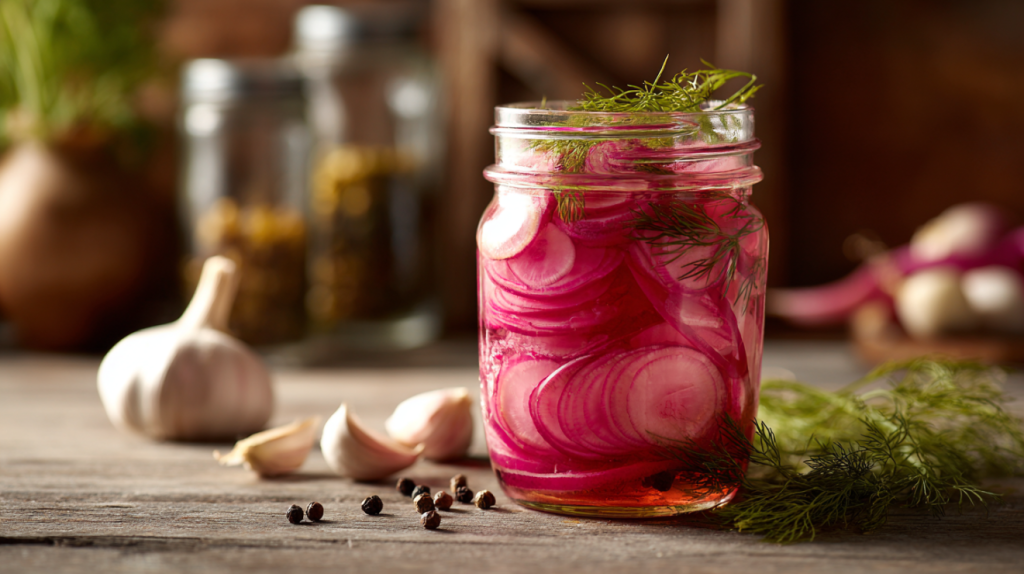
A jar of pickled radishes is one of the most useful things you can have sitting in your refrigerator, and this pickled radish recipe is the one I have been making for more years than I can count. Once you see how simple it is — just a quick brine, a handful of fresh radishes, and a little patience — you will wonder why you ever bought the store-bought kind.
If you have been looking for a way to add something bright and crunchy to your plates without a lot of fuss, this is it. Maybe you have tried pickled radishes at a restaurant and wanted to recreate that same tangy, peppery bite at home. Or maybe you have a garden full of radishes and need a way to put them up before they go soft. Either way, this recipe walks you through every step so you get perfect, crisp pickled radishes every single time.
The Simple Beauty of a Good Pickled Radish
Pickled radishes have been in Southern kitchens for as long as there have been gardens and mason jars. My mother kept a jar in the icebox all summer long, right next to her chow-chow and bread and butter pickles. They were not fancy — just radishes, vinegar, and whatever herbs were growing by the back door — but they turned a plain plate of beans and cornbread into something special.
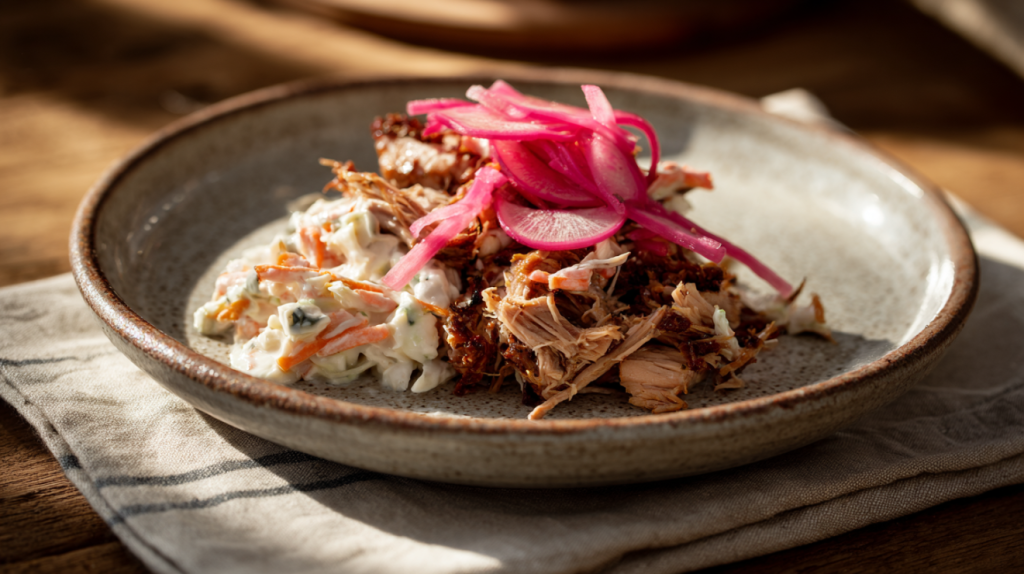
What I love about pickled radishes is how they balance out rich, heavy food. A pile of pulled pork, a plate of fried catfish, a bowl of creamy grits — they all benefit from that sharp, clean crunch. The vinegar cuts through the richness, the pepper from the radish wakes up your palate, and the crispness gives everything a little life. It is one of those small additions that makes the whole meal feel more complete.
This version is the one I have settled on after decades of tinkering. It uses a straightforward vinegar brine with just enough sugar to round the edges, mustard seeds for a little warmth, and fresh dill because I cannot imagine pickles without it. It is not complicated, and that is entirely the point. If you are exploring how pickling and preserving fit into a Southern kitchen, I cover the broader tradition in The Complete Guide to Southern Cooking: Techniques, Traditions & Time-Tested Wisdom — it is a good place to start.
What Goes Into the Jar and Why It Matters
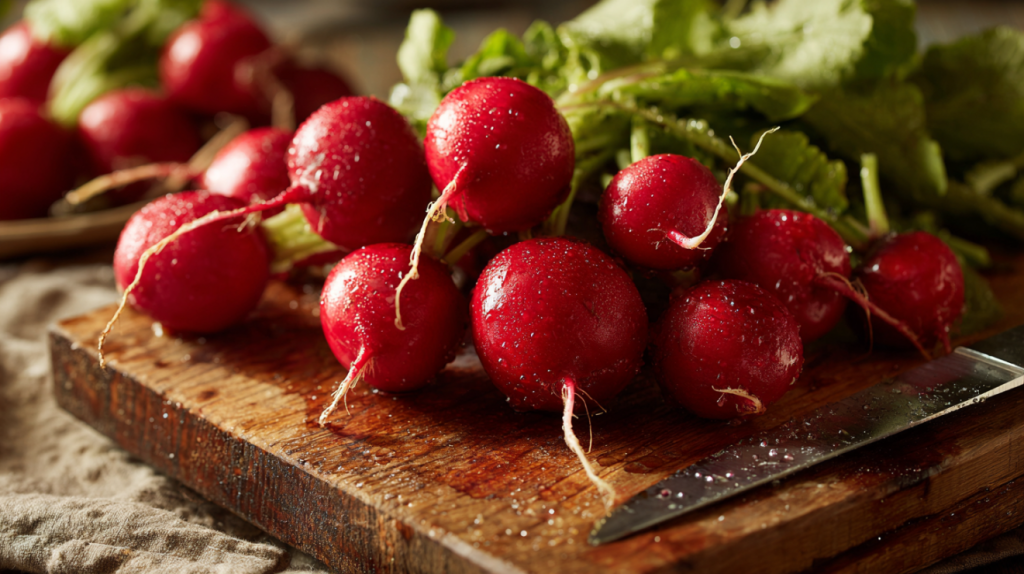
The radishes themselves are the star, and they need to be firm. I mean firm enough that when you press your thumbnail into the skin, it resists. A soft radish will turn to mush in the brine, and no amount of seasoning fixes that. Red radishes are the classic choice, and they work beautifully — the brine turns the prettiest shade of pink as the color bleeds out. But if you can get your hands on watermelon radishes or Easter egg radishes, the colors are stunning in the jar.
The vinegar is doing the real work here. I use plain white vinegar at 5% acidity because it gives you a clean, sharp pickle that lets the radish flavor come through. Apple cider vinegar works too and adds a slightly mellower, rounder taste — I use it sometimes in the fall when I want something a little warmer. Rice vinegar makes a softer pickle, almost delicate, and it is nice if you plan to use these on tacos or rice bowls. All three work, but white vinegar is the one I reach for most.
Don’t Forget the Sugar!
The sugar is not there to make these sweet. It is there to take the harsh edge off the vinegar so the brine tastes balanced rather than aggressive. Two tablespoons in the whole batch is just enough — you should not taste sweetness in the finished pickle. The mustard seeds and black peppercorns add a gentle warmth that builds over time as they sit in the brine. And the garlic — smash those cloves rather than slicing them. A smashed clove releases its oils slowly into the brine without overpowering the radish.
When it comes to substitutions, here is my honest take. Fresh dill is best, but dried dill works if that is what you have — use about a teaspoon where I call for fresh sprigs. Do not substitute iodized table salt for kosher salt. Table salt has anti-caking agents that cloud the brine and can give it an off taste. If you do not have kosher salt, sea salt is a better swap. The red pepper flakes are optional but I always include them — they do not make the pickles spicy, they just add a faint warmth in the background.
How to Make Pickled Radishes That Stay Crisp and Full of Flavor
This is a quick pickle recipe, which means no canning, no water bath, no pressure cooker. You make the brine, pour it over the radishes, and let the refrigerator do the rest. It is one of the most forgiving things you can make in a kitchen, but there are a few details that separate a good jar from a great one.
Getting Your Radishes Ready
Start by washing your radishes well under cold running water. Scrub them with your hands — radishes grow in dirt and they hold onto it, especially around the top where the greens attach. Trim off the greens and the root tail, then take a close look at each one. You want firm radishes with tight, smooth skin. If any feel spongy or have brown soft spots, set those aside for something else.
Now slice them thin. I mean thin — about an eighth of an inch, roughly the thickness of two stacked nickels. This is where a mandoline earns its place in the kitchen. If you are using a knife, take your time and try to keep the slices as even as possible. Uneven slices mean uneven pickling — the thin ones get soft while the thick ones stay too raw. You will know you are cutting them right when you can almost see light through the slices.
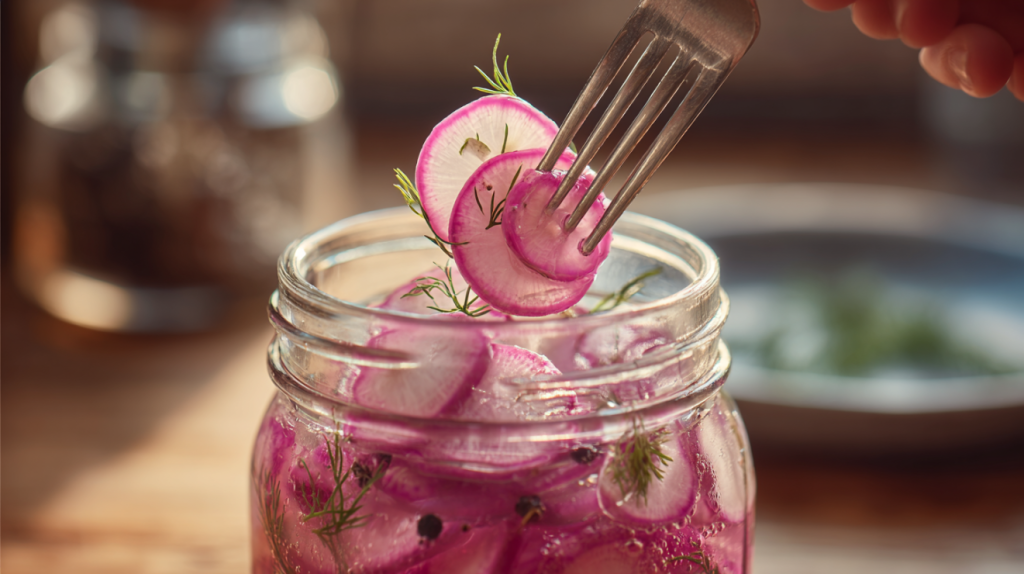
Pack the sliced radishes into clean mason jars. Do not skip this part — the jars need to be clean, not just rinsed. Wash them in hot soapy water and let them air dry or run them through the dishwasher. Drop the smashed garlic cloves, dill sprigs, and red pepper flakes into the jars on top of the radishes. I like to tuck the dill down along the sides of the jar where it looks pretty and distributes its flavor evenly. Understanding how the tools of a Southern kitchen work makes everything easier, and I walk through the essentials in Building a Southern Kitchen on a Budget: The 5 Essential Tools.
Making the Brine
Combine the vinegar, water, sugar, salt, peppercorns, mustard seeds, and bay leaves in a small saucepan. Set it over medium-high heat and stir a few times as it heats up. You are watching for two things — first, the sugar and salt need to dissolve completely. Stir and look at the bottom of the pan. When you do not see any granules sitting there anymore, that is when they are dissolved. Second, you want the brine to come to a full boil. Not a simmer, not a few lazy bubbles — a real, rolling boil where the surface is moving with energy.
As the brine heats, your kitchen will start smelling sharp and vinegary. That is normal and it means things are working. The mustard seeds will start to pop and dance a little in the liquid — that is them releasing their oils, which is exactly what you want. The whole process takes about four to five minutes from a cold pan to a full boil.
The USDA’s Complete Guide to Home Canning recommends using vinegar with at least 5% acidity for safe pickling. Check the label on your vinegar bottle — it will say the acidity percentage right on it. This is one of those details that matters both for safety and for the quality of your finished pickle.
Bringing It All Together
Pull the brine off the heat and pour it carefully over the radishes in the jars. Pour slowly — the liquid is boiling hot and the glass jars can crack if you rush. Fill each jar to within about half an inch of the rim. The radishes need to be completely covered by the brine. If any slices are poking up above the surface, press them down with a clean spoon or add a little more brine.
Here is a detail most recipes skip: do not put the lids on yet. Let the jars sit on the counter, uncovered, until the brine cools to room temperature. This takes about thirty to forty-five minutes. Sealing the jars while the brine is still hot traps steam inside, which creates condensation on the lid and can dilute the top layer of brine. It also prevents the jars from sealing under vacuum, which is not what you want for a refrigerator pickle — you want to be able to open and close them easily.
Be Sure To Let the Brine Cool
Once the brine is cool, seal the jars and put them in the refrigerator. The pickled radishes are technically ready after two to three hours, but I always tell people to wait at least overnight. After twenty-four hours, the brine has had time to fully penetrate the slices, the garlic has mellowed, the dill has infused, and the flavors have married into something cohesive and bright. After three days, they are at their absolute best. Pickling is very much in the spirit of Southern preservation, and if you want to explore more of that tradition, Canning & Preserving: A Beginner’s Guide to Southern Traditions covers the foundations.
What to Serve Alongside Pickled Radishes
The beauty of pickled radishes is that they make almost everything on the table taste better. Their sharp, vinegary bite is the perfect counterpoint to rich, heavy food. I put them out with barbecue more than anything else — a few pickled radish slices on top of a pulled pork sandwich cuts through the smoke and sweetness of the sauce in a way that makes your mouth sing. They are just as good alongside a plate of fried catfish or smothered pork chops.
For Sunday dinner, I set the jar right on the table and let people help themselves. They go beautifully next to a bowl of creamy grits, a plate of collard greens, or a big pot of butter beans. The acid from the pickle brightens all of those slow-cooked, deeply savory flavors. If you are putting together a summer potluck or a holiday spread, pickled radishes on a relish tray with good bread and butter pickles and some chow-chow is the kind of detail that people notice and remember.
For weeknight suppers, toss a handful on top of tacos, grain bowls, or a simple plate of rice and beans. They add crunch, color, and flavor without any extra cooking. I have also been known to tuck them into a grilled cheese sandwich, and I am not sorry about it.
Ways to Change It Up
Sweet and Spicy Pickled Radishes
Double the sugar to four tablespoons and add a sliced fresh jalapeño to each jar. The extra sweetness paired with the real heat from a fresh pepper makes a pickle that is absolutely addictive on fish tacos and fried chicken sandwiches. My youngest granddaughter eats these straight out of the jar and I have to make a separate batch just for her.
Asian-Inspired Pickled Radishes
Swap the white vinegar for seasoned rice vinegar, skip the dill and mustard seeds, and add a teaspoon of toasted sesame oil and a tablespoon of soy sauce to the brine. These are lighter and more delicate, and they are wonderful with rice dishes, noodle bowls, and grilled meats. The flavor is different from the Southern version but every bit as good.
Herb Garden Pickled Radishes
Replace the dill with whatever fresh herbs you have growing — tarragon, thyme, and a sprig of rosemary make a beautiful combination. Add a strip of lemon zest to each jar for brightness. This version is especially nice in spring and early summer when the herb garden is going strong. The role of acid and fresh herbs in building flavor is one of those fundamentals I talk about in The Role of Acid in Southern Cooking: Vinegar, Lemon, and Hot Sauce.
Smoky Pickled Radishes
Add a teaspoon of smoked paprika to the brine and swap the dill for a sprig of fresh thyme. These have a deep, warm undertone that pairs beautifully with grilled and smoked meats. Smoked paprika dissolves right into the hot brine and tints the whole jar a gorgeous golden-pink color.
Storing, Reheating, and Make-Ahead Tips
Pickled radishes are one of the easiest make-ahead items in any kitchen. They keep in sealed mason jars in the refrigerator for up to three weeks, and they actually get better in the first few days. I make a batch every Sunday so I always have them ready for the week ahead.
Always use a clean fork or spoon to pull radishes from the jar — never your fingers. Introducing bacteria shortens the shelf life. Keep the remaining radishes submerged in the brine. If the brine level drops below the radishes after a week or so of eating, you can top it off with a splash of vinegar to keep everything covered.
These are a refrigerator pickle and are not designed for shelf-stable canning unless you follow a tested canning recipe with proper processing. For more on the difference and how to approach preservation safely, Canning 101: A Guide to Water Bath vs. Pressure Canning breaks it all down. If you want to freeze pickled radishes, I would not recommend it — freezing breaks down the cell structure and you will lose that crisp snap that makes them worth making in the first place.
Creative Ways to Use Leftover Pickled Radishes
Pickled Radish Relish
Chop the pickled radishes finely and mix them with a little diced red onion, fresh parsley, and a drizzle of olive oil. This makes a quick relish that is outstanding on grilled burgers, hot dogs, or fish. Think of it as a Southern take on a condiment that adds crunch and tang all at once.
Pickled Radish Potato Salad
Fold chopped pickled radishes into your potato salad in place of (or in addition to) regular pickles. They add a different kind of crunch and a peppery note that wakes up the whole bowl. I started doing this a few years ago and now people specifically request it for cookouts.
Pickled Radish and Egg Salad Sandwich
Dice the pickled radishes small and stir them into egg salad. The vinegar from the pickle reduces how much mayo you need, and the crunch is a welcome surprise. It is one of those combinations that sounds odd until you try it, and then you cannot go back to plain egg salad.
Use the Brine
Do not throw the brine away when the radishes are gone. It is already seasoned and flavored, and it makes an excellent base for a quick vinaigrette, a splash in a Bloody Mary, or a brine for a second quick pickle of thinly sliced onions or cucumbers.
Southern Pickled Radish Recipe
Equipment
- Mason Jars (pint-sized)
- Small Saucepan
- Cutting board
- Sharp knife or mandoline
Ingredients
Pickled Radishes
- 2 lb fresh radishes red, watermelon, or Easter egg varieties
- 1.5 cup white vinegar 5% acidity
- 1.5 cup water
- 2 tbsp granulated sugar
- 1 tbsp kosher salt
- 1 tsp whole black peppercorns
- 1 tsp mustard seeds
- 2 bay leaves
- 3 cloves garlic peeled and lightly smashed
- 4 sprigs fresh dill or 1 tsp dried dill
- 0.5 tsp red pepper flakes optional, for heat
Instructions
Prepare the Radishes
- Wash and trim the radishes, removing the tops and root ends. Slice into thin rounds, about 1/8 inch thick. A mandoline makes this quick and even, but a sharp knife works fine.
- Pack the sliced radishes into clean pint-sized mason jars, dividing the garlic, dill sprigs, and red pepper flakes evenly between jars.
Make the Brine
- Combine the white vinegar, water, sugar, kosher salt, peppercorns, mustard seeds, and bay leaves in a small saucepan. Bring to a boil over medium-high heat, stirring until the sugar and salt dissolve completely.
- Remove the brine from heat and carefully pour over the radishes in the jars, filling to within 1/2 inch of the rim. Make sure the radishes are fully submerged.
Cool and Refrigerate
- Let the jars sit on the counter, uncovered, until the brine cools to room temperature, about 30-45 minutes.
- Seal the jars with lids and refrigerate. The pickled radishes are ready to eat after 2-3 hours, but the flavor deepens beautifully after 24 hours. Store in the refrigerator for up to 3 weeks.
Nutrition
Rate This Recipe
Share This Recipe With The Ones You Love!Everything You Want to Know About Pickled Radishes
How long do pickled radishes last in the refrigerator?
Properly stored in a sealed jar with the radishes fully submerged in brine, they keep for up to three weeks in the refrigerator. I have pushed them to four weeks and they were still safe, but the texture starts to soften past the three-week mark. For the best crunch, eat them within the first two weeks.
Can I use apple cider vinegar instead of white vinegar for pickled radishes?
Absolutely. Apple cider vinegar gives a slightly mellower, warmer flavor compared to the clean sharpness of white vinegar. Just make sure whatever vinegar you use has at least 5% acidity — it will say so on the label. Both work beautifully, and the choice comes down to what flavor you prefer.
Why did my pickled radishes turn soft and mushy?
The most common reason is starting with radishes that were not fresh and firm. If they were even a little soft before going into the jar, they will not hold up in the brine. Cutting them too thick can also cause issues — thick slices absorb brine unevenly and the outer layer softens while the center stays raw. Slice them to a consistent eighth of an inch for the best results.
Do I need to sterilize the jars for pickled radishes?
For a quick refrigerator pickle like this, you do not need to sterilize the jars in boiling water. Washing them thoroughly in hot soapy water or running them through the dishwasher is sufficient.
Can I pickle other vegetables using the same brine recipe?
This brine works wonderfully for thin-sliced onions, cucumbers, carrots, and green beans. The timing will vary depending on the vegetable — onions pickle in about an hour, carrots take a full day — but the brine ratio stays the same. I keep a rotation going in my refrigerator and just swap out what goes into the jar based on what is fresh.
Why did my brine turn pink?
That is just the natural pigment from the red radish skins dissolving into the brine. It is completely normal and actually quite pretty. The radishes themselves will lighten in color as the pigment moves into the liquid. If you use white radishes like daikon, the brine stays clear.
How do I make pickled radishes less sharp and vinegary?
If the vinegar flavor is too strong for your taste, increase the water in the brine by a quarter cup and add an extra tablespoon of sugar. This softens the acid and rounds out the flavor. You can also let them sit in the refrigerator for a full three to four days — time mellows the sharpness considerably.
Go On and Make Yourself a Jar
A jar of pickled radishes takes almost no time to put together, costs next to nothing, and earns its keep in your refrigerator ten times over. Once you get in the habit of making them, you will start reaching for that jar more than you would believe — on sandwiches, alongside dinner, straight out of the jar at midnight when nobody is watching. This pickled radish recipe is one of those quiet little kitchen wins that makes every meal a little brighter.
Go make a batch. Use the good radishes, slice them thin, and let that brine work its magic. And when you pull out that first crisp, tangy slice and realize how simple and satisfying it is, come back and let me know how it turned out. I always love hearing how things go in your kitchen.